|
|
Post by element on Dec 27, 2020 11:39:12 GMT
Since Autumn 2019 we are the happy owners of a 2007 Jeanneau Sun Odyssey 39i Performance. Before that, we owned a 34-foot Etap which we happily sailed for 11 years. We logged more than 20.000 miles with her and took her from the Netherlands many times to England, France, Germany and Denmark. Our future dream is to do a two-years Atlantic Circuit. For this, the Etap has some shortcomings. We started to look for a boat with more storage and living space, a bigger cockpit with possibility for a bimini to have shade in the tropics, a separate shower, bigger tanks for fuel and water and more room for guests. After extensive research, we bought a Jeanneau Sun Odyssey 39i Performance. It ticks all the boxes above and is a fast and comfortable sailor. We deliberately went for the Performance version of the Sun Odyssey range. The taller rig gives better light wind performance. Also upgrades such as an adjustable jib-cars from the cockpit, adjustable back-stay, dyneema halyards, stronger (dyform) shrouds and laminate sails make sailing more fun.  When we bought her, the boat was in mint condition and well equipped for Coastal and Off-shore sailing. But, as always, there are things a new owner wants to improve. Especially with our plans to cross an Ocean with her. I will add now and then some posts to this thread of the smaller and bigger improvements we did so far. From the little things to make the boat ours to bigger projects to make the boat ready for an ocean crossing and living for a longer period off-grid. In the meantime, we enjoy our new Element already very much. Despite Covid-19, we took her many weekends to one of the nice old towns of the IJsselmeer, the Netherlands. And we had a few short holidays at one of the Friesean Isles (Terschelling) and took her last summer to the Solent at the English South coast. Happy reading and of course comments welcome! |
|
|
|
Post by element on Dec 27, 2020 11:49:07 GMT
This post will be about the first steps we did to make the boat ours. This starts with renaming the boat. Our previous boat was called Element. We like this name. It suits us and is short and easy to pronounce in Dutch, English, German and French. We decided that the new boat was going to be called Element as well. First, we had to remove the old name. This worked pretty well with a hair dryer:  Then the new name was applied. Name-stickers can be ordered everywhere on the Net nowadays. Most time took it to find a front type we liked most.  Finally, the boat was formally re-named with champagne for the boat (and some for us)  Also, the previous name of the boat was stitched on the boom cover. Anneke has removed the letters stich by stich. As a result, the cover was not watertight anymore. This has been solved by our sailmaker with a patch with the name.  |
|
|
|
Post by element on Dec 27, 2020 12:03:28 GMT
A new name nowadays means also you have to (re)program equipment with our new name, MMSI number. We took over the callsign of the previous owner, so our VHF did not need re-programming. What did need reprogramming was the AIS transceiver with our new boat name, which can be done by installing AIS pro on a laptop and connect the laptop with the AIS. A few days later also Marine traffic was updated with our new name:  We took our EPIRB (Emergency Position Indicating Radio Beacon) from our previous boat. So a new MMSI number had to be programmed in it. This could only be programmed by the supplier (Shiptron). It is relative costly (60 euro’s) but required from a legal and safety point of view.  We also intended to move our old handheld VHF to the new boat. However it was so expensive to reprogram the ATIS code that we decided to buy a new one. The new handheld VHF is smaller, easier to store in a grab bag and has much more modern functionality like DCS (Digital Selective Calling, a digital emergency procedure) and a GPS inside to be able to report your position to the Search and Rescue services when in need and the option to record and repeat the latest messages.  |
|
|
|
Post by MalcolmP on Dec 27, 2020 12:33:40 GMT
Looks very smart indeed. Only thing gave me a fright was the photo using the hair-dryer. Mains equipment is just so dangerous, near seawater, for that reason alone I have a Milwaukee Lithium battery polisher. But congratulations on the new name - I think Element is perfect, but then I was a chemist... Take care.
|
|
|
|
Post by zaphod on Dec 27, 2020 19:11:00 GMT
Nice boat! I would have liked to get the Performance model but for some reason they are quite hard to come by on the West Coast of Canada.
Is your boat set up with a symmetric spinnaker, or is that a whisker pole on your mast?
How did they set up the backstay adjuster on the performance models? It is a mod I am considering on my 39i.
|
|
|
|
Post by sabmd42 on Dec 27, 2020 22:09:21 GMT
Congratulations. It's a beautiful boat. I am looking forward to reading about your adventures.
Steve
|
|
|
|
Post by John on Dec 27, 2020 22:24:19 GMT
Good choice of boat the performance will make sailing her much more enjoyable , a few improvements worth doing fit a pair of timber doors outside the existing hatch much easier when on a marina , leave the original as is to use at sea .
Fit a whisker pole on mast for genoa and a removable inner forestay for a storm jib or very small jib we fitted this just before the genoa furler to use the bow stainless as strong point .
Boom brake is planned next well worth the purchase . Pm for longer list if interested
|
|
|
|
Post by element on Dec 28, 2020 8:41:19 GMT
All, thanks for the remarks so far. It gives me more than enough for some new posts. First about the question of Zaphod on whisker pole/coloured foresails: The previous owner had already equipped the boat with both a gennaker pole and a whisker pole. So we have the luxury of both. The gennaker pole is the removable Selden type and enables to fly a asymmetric gennaker before the bow. The Selden system is set within a minute. We fly a beast of 120m2 (the performance version is bigger than the standard version). I have only a picture of the full sail of the previous owner, the 2nd picture is from me.   The whisker pole is used in two ways: - If we want to sail more from the wind then say 150 degrees, the genny will become less effective because it is covered by the mainsail. However, with the whisker pole, the tack of the genny can removed from the bow sprit and brought to windward with the whisker pole. Just like with a symmetrical spinnaker. I have not done this yet on the 39i but it worked very good on a 28 footer we owned 15 years ago. Downside is of course that you can’t gybe, because then the tack and clew become mixed up.
- The other purpose of the whisker pole, which we (and of course many others) use much more often, is booming out the jib to windward when sailing downwind above 15 knots. The picture below is taken an overnight passage from England to Netherland. Even above 20 knots of wind the boat stays beautifully balanced. With the autopilot enabled, speeds were constant above 8 knots. Note that we always set a preventer in these conditions.
 |
|
mdrsail
Full Member

Posts: 43
Jeanneau Model: 2008 39i
Yacht Name: Grace
Home Port: MDR
Country: USA
|
Post by mdrsail on Dec 28, 2020 21:53:11 GMT
Hi, Element- Like you, we just bought a 39i for those purposes. Can you tell me which whisker pole you use?
|
|
|
|
Post by element on Dec 29, 2020 10:04:30 GMT
Here some answers on questions asked by several of you: @ mdrsail: first of all congrats with your 39i! I am sure you will love her. The whisker pole is from Selden, like mast, boom and gennaker pole. It is about 420 cm long (J-measurement of a 39i is 421 cm so this makes sense) and 84 mm wide. Please let me know if you need more information and/or pictures of the setup. @ Zaphod: below some pictures of the backstay adjuster. It is a rather unusual design. But I guess this is the standard, ex works setup of 39i performance versions By pulling a 4-to-one pulley at the base of the starboard backstay, the lowest wire on the photo is tensioned. This brings the device on the picture downwards, pulling the v-shaped twin backstay is pulled together. This makes the total length shorter. I works very well in practice. In my opinion, it is a must have to flatter your sails when the wind builds up.   |
|
|
|
Post by element on Dec 29, 2020 11:59:46 GMT
Good choice of boat the performance will make sailing her much more enjoyable , a few improvements worth doing fit a pair of timber doors outside the existing hatch much easier when on a marina , leave the original as is to use at sea . Fit a whisker pole on mast for genoa and a removable inner forestay for a storm jib or very small jib we fitted this just before the genoa furler to use the bow stainless as strong point . Boom brake is planned next well worth the purchase . Pm for longer list if interested And excellence list of improvements. Most of them are already done on our boat. First of all, a much lighter and spilt door is indeed much nicer then the one piece version which is also quite heavy.  I also fitted a removable forestay. We can fly a heavy weather (working) jib on it. I also have a orange storm jib for it which I never hope to use. More info about this inner forestay is already described in this post: click here
As you can see we have an inner forestay. I am curious about your setup before the genua, so a picture is welcome. We don't have a boom brake. I so set a preventer when sailing (almost) downwind. It is only a bit of a hassle to set and remove when we need to gybe. So am im interested in real live experience of any who is using a boom brake. The previous owner and we did dozens of other improvements. I will post some of these in this thread. Will send you a PM with our list of improvements. |
|
|
|
Post by zaphod on Dec 30, 2020 2:37:34 GMT
Good choice of boat the performance will make sailing her much more enjoyable , a few improvements worth doing fit a pair of timber doors outside the existing hatch much easier when on a marina , leave the original as is to use at sea . Fit a whisker pole on mast for genoa and a removable inner forestay for a storm jib or very small jib we fitted this just before the genoa furler to use the bow stainless as strong point . Boom brake is planned next well worth the purchase . Pm for longer list if interested And excellence list of improvements. Most of them are already done on our boat. First of all, a much lighter and spilt door is indeed much nicer then the one piece version which is also quite heavy. I also fitted a removable forestay. We can fly a heavy weather (working) jib on it. I also have a orange storm jib for it which I never hope to use. More info about this inner forestay is already described in this post: click here
As you can see we have an inner forestay. I am curious about your setup before the genua, so a picture is welcome. We don't have a boom brake. I so set a preventer when sailing (almost) downwind. It is only a bit of a hassle to set and remove when we need to gybe. So am im interested in real live experience of any who is using a boom brake. The previous owner and we did dozens of other improvements. I will post some of these in this thread. Will send you a PM with our list of improvements. A boom brake is on my wishlist too. I've never used one, but I've had a couple of gybes where the main has come across harder than I would like, usually when our hands are full gybing the spinnaker. I like the simplicity of the Wichard unit, but I have no experience with such things. Element, I am curious....it looks like your cockpit enclosure ends at the wheels...is that just an illusion? If not, why did you do it that way? |
|
|
|
Post by element on Dec 30, 2020 9:44:48 GMT
Element, I am curious....it looks like your cockpit enclosure ends at the wheels...is that just an illusion? If not, why did you do it that way? Hi Zaphod, This is correct and a deliberate choice. The cockpit enclosure which ends at the wheels is big enough for our needs and it has 2 big advantages: 1) It is much more easy to enter the cockpit enclosure from the rear side. You can easily walk in from between the two wheels whilst I have to duck deep if entering from the side. 2) Main reason: we can sail even with the cockpit enclosure in place. The wheel and winches can still be operated. So if it is very cold and/or wet (which we face often times in the Netherlands, especially because we continue sailing in Wintertime), you can sit very warm, dry and comfortable under this enclosure. See also this short movie which I made at the beginning of this year (it was March then, and just above zero celsius): |
|
|
|
Post by zaphod on Dec 30, 2020 18:59:05 GMT
Element, I am curious....it looks like your cockpit enclosure ends at the wheels...is that just an illusion? If not, why did you do it that way? Hi Zaphod, This is correct and a deliberate choice. The cockpit enclosure which ends at the wheels is big enough for our needs and it has 2 big advantages: 1) It is much more easy to enter the cockpit enclosure from the rear side. You can easily walk in from between the two wheels whilst I have to duck deep if entering from the side. 2) Main reason: we can sail even with the cockpit enclosure in place. The wheel and winches can still be operated. So if it is very cold and/or wet (which we face often times in the Netherlands, especially because we continue sailing in Wintertime), you can sit very warm, dry and comfortable under this enclosure. See also this short movie which I made at the beginning of this year (it was March then, and just above zero celsius): Oh I see, it is more of a dodger extension than a cockpit enclosure. The down side is it still leaves the helmsman out in the weather. We have a more elaborate enclosure that can enclose the entire cockpit including the helm stations. We can still sail because there are removable cutouts for the winches. We have been sailing in the pouring rain and stay warm and dry. The enclosure makes the entire cockpit liveable in bad weather. Ours is a modular system so we have different configuration options for different seasons. The side curtains can be rolled up or removed. We usually take the side panels off the boat in the spring. The bimini provides shade for the entire cockpit on hot sunny days, and we can zip in the connector between the bimini and the dodger to provide rain shelter. We can also fold back the bimini if we want open air sailing, although we find we like the shade when it is sunny. The full enclosure does ruin the lines of the boat when it is up, but it also makes winter cruising much more pleasant. We don't go far in winter but we do like to get away, and it is nice to stay warm and dry when we do!    |
|
|
|
Post by element on Jan 24, 2021 9:53:59 GMT
Oh I see, it is more of a dodger extension than a cockpit enclosure. The down side is it still leaves the helmsman out in the weather. We have a more elaborate enclosure that can enclose the entire cockpit including the helm stations. We can still sail because there are removable cutouts for the winches. We have been sailing in the pouring rain and stay warm and dry. The enclosure makes the entire cockpit liveable in bad weather. Ours is a modular system so we have different configuration options for different seasons. The side curtains can be rolled up or removed. We usually take the side panels off the boat in the spring. The bimini provides shade for the entire cockpit on hot sunny days, and we can zip in the connector between the bimini and the dodger to provide rain shelter. We can also fold back the bimini if we want open air sailing, although we find we like the shade when it is sunny. The full enclosure does ruin the lines of the boat when it is up, but it also makes winter cruising much more pleasant. We don't go far in winter but we do like to get away, and it is nice to stay warm and dry when we do! Hi Zaphod, You are right. It is more a dodger extension which works perfectly whilst sailing or in te harbour when it is wet and/or cold.   I fully understand, your solution to be able to cope with the Canadian climate. It does ruin the lines of the boat but i think comfort would prevail aesthetics. On our project list is a bimini to have shade when it really gets hot. Not per se necessary in western Europe, but I think a must have when will sail down to the Canaries and Caribbean in a few years. |
|
|
|
Post by element on Jan 24, 2021 13:36:27 GMT
OK, in this post some smaller improvements at deck: Flagpole and ensign
The previous owners had taken the flagpole and Dutch ensign to their new boat. Easy to fix by a visit to our local chandler.  Pad Eyes for lifelines Pad Eyes for lifelines
Although the previous owner logged many miles off-shore and had fitted jack-lines when going to the foredeck, there were strangely enough no strongpoints in the cockpit to attach a lifeline. I solved this by mounting several folding Winchard pad eyes. 
Cargo boom for outboard engine
When at anchor, our rubber inflatable 2.7m (9ft) Zodiac dinghy is the lifeline with ashore. It planes easily, even with 2 persons with the 4hp engine, which I upgraded to 6ph by installing a bigger carburettor. However, when there is some swell, it was a small nightmare to carry the 27kg outboard engine from the dinghy to the pushpit. The cargo boom from Plastimo makes this task much easier. What I like of the design as well is that it can easily be removed when not in use. It fits then nicely in the supplied cover which hardly takes any place when stored below.  Larger Anchor and longer & stronger chain Larger Anchor and longer & stronger chainWhen we bought the Jeanneau it had a Rocna 20 kilo anchor. This is an excellent anchor and for normal conditions sufficient for a 39 feet boat. With the plans we have in mind have switched it for a 25 kilo version. The 20 kilo version was sold within one day on the internet for almost 80% of the new prices. Makes clear how popular Rocna anchors are. I don’t know if we really need a bigger anchor but it will give us a safer feeling when we have to ride out a storm under anchor. Additionally, the original 10mm chain was 35 meters which long. It was extended with 20 meters with a removable/emergency shackle, but this is literally the weakest link. I sold one part the old chain and purchased 65 meters of chain. It is grade 40 quality with a working load of 1600 kilo and breaking load of 7 tonnes. So, we have never to worry if the chain is strong enough. We took the aluminum Spade anchor from our previous boat as spare anchor. It had 8mm chain connected to it, which is too small for the windlass. Therefore, I replaced this with a part of the old 10mm chain and sold the 8mm chain. 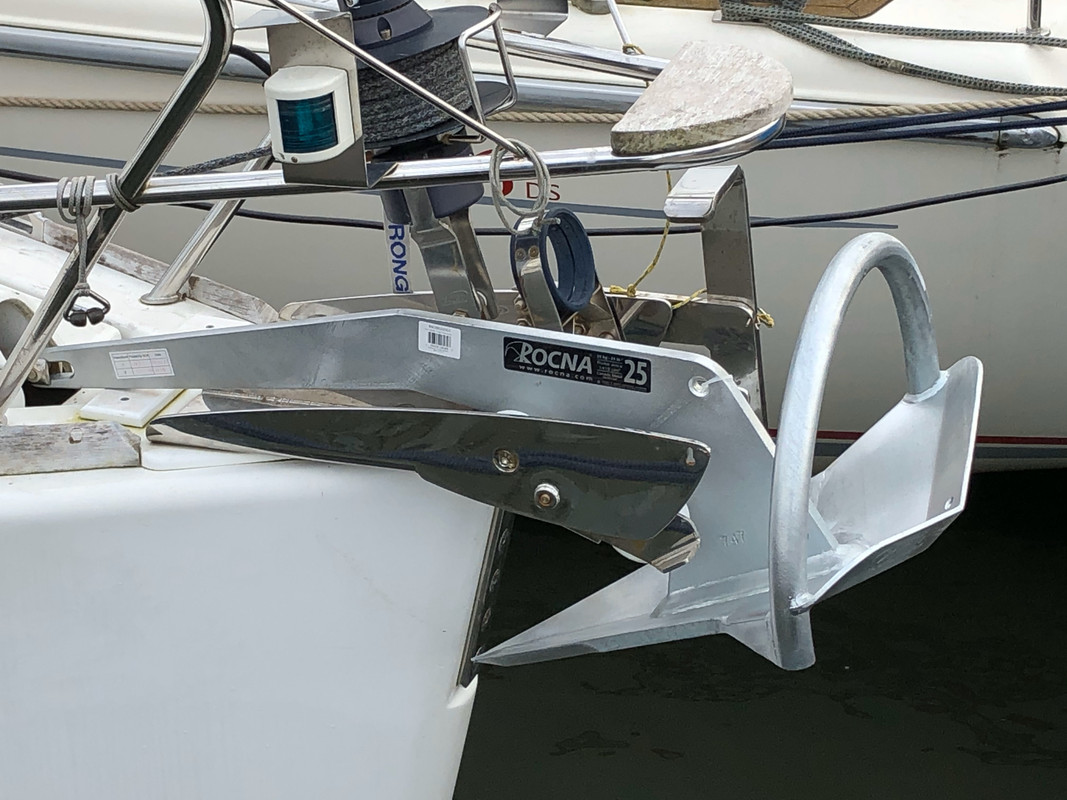 |
|
|
|
Post by zaphod on Jan 24, 2021 18:47:09 GMT
An outboard davit is something we would like to install too. Can you post a pic of the base of the davit to show how it mounts to the rail?
I see you have the Selden bowsprit kit. Can you still use the bowsprit with the Rocna on the bow? I was contemplating one, but thought it would interfere with the sprit.
Also, what is that angled bracket just forward of the bowsprit sleeve for?
|
|
|
|
Post by element on Jan 24, 2021 19:39:47 GMT
A friend of me was earlier interested in this engine hoist, so I had already a picture of the base mount. It is actually not mounted on the mail but on deck which makes it much stronger and gives less load on the rail.  This is the link on the Plastimo website of this product: plastimo cargo boom |
|
|
|
Post by element on Jan 24, 2021 19:58:19 GMT
I see you have the Selden bowsprit kit. Can you still use the bowsprit with the Rocna on the bow? I was contemplating one, but thought it would interfere with the sprit. Also, what is that angled bracket just forward of the bowsprit sleeve for? With the 20kg Rocna which was originally mounted, there is no interference with the sprit at all. When we upgraded to the 25kg version, I have to say it is a very tight fit to mount the bow sprit. Actually, most easy is to drop the anchor an inch before I mount the selden bow sprit. When the bow sprit is attached, I tension the anchor chain again until it just hits the bow sprit. I have put for the moment some protection (blue strap) on the anchor to ensure that there is no direct contact between anchor and bow sprit. Again this would not be nessecary with the 20kg Rocna.  This picture above does also give away what that angled bracket is: it is a bow ladder. At this position there is one step, but there is a swivel below on the picture so the 2nd step folds down. In the Netherlands, it is quite common to moor bow first in a marina. And then this step makes it much easier to come aboard! Edit: I just found a picture of detail of the bow sprit in combination with the 25kg Rocna:  |
|
|
|
Post by dbostrom on Jan 24, 2021 20:32:23 GMT
We have the same configuration (39ip) and so it's a special treat to follow this. Thanks!  I sailed ours for about one hour prior to buying and fell madly in love after which rational choice was over. But we got lucky; the prior owner was scrupulous and also a former committed blue water racing type and had already done some good tweaks. After that, further dawning comprehension of this boat's overall sweet spot in hitting details such as cleats, fairleads, helm footwells. Lombard is a genius and Jenneau translated that mental horsepower into affordability. Down below, also many good design choices, many quite subtle. The list of virtues is almost endless. |
|
|
|
Post by zaphod on Jan 24, 2021 21:58:48 GMT
I see you have the Selden bowsprit kit. Can you still use the bowsprit with the Rocna on the bow? I was contemplating one, but thought it would interfere with the sprit. Also, what is that angled bracket just forward of the bowsprit sleeve for? With the 20kg Rocna which was originally mounted, there is no interference with the sprit at all. When we upgraded to the 25kg version, I have to say it is a very tight fit to mount the bow sprit. Actually, most easy is to drop the anchor an inch before I mount the selden bow sprit. When the bow sprit is attached, I tension the anchor chain again until it just hits the bow sprit. I have put for the moment some protection (blue strap) on the anchor to ensure that there is no direct contact between anchor and bow sprit. Again this would not be nessecary with the 20kg Rocna. This picture above does also give away what that angled bracket is: it is a bow ladder. At this position there is one step, but there is a swivel below on the picture so the 2nd step folds down. In the Netherlands, it is quite common to moor bow first in a marina. And then this step makes it much easier to come aboard! Edit: I just found a picture of detail of the bow sprit in combination with the 25kg Rocna: That is good news! I still have the original Delta style plow anchor that came with the boat, and would like to upgrade it, but I didn't think the Rocna would work with our sprit. I always wondered why Europeans like to moor bow in with no fingers. Boarding the boat and loading gear via the bow must be a real pain in the butt! Is it so more boats can be squeezed in? Why not stern in so boarding is easy? I guess we are spoiled around here where all docks have fingers allowing access to the side of the boat for boarding and loading. |
|
|
|
Post by element on Jan 25, 2021 8:37:59 GMT
I always wondered why Europeans like to moor bow in with no fingers. Boarding the boat and loading gear via the bow must be a real pain in the butt! Is it so more boats can be squeezed in? Why not stern in so boarding is easy? I guess we are spoiled around here where all docks have fingers allowing access to the side of the boat for boarding and loading. You make me even more aware about that Europeans like to moor bow in with no fingers. I guess because: a) many don't dare to moor stern in because you have to do this in reverse and b) it gives a bit more privacy bow in because the cockpit is then not directly visible from the jetty. The reason why many marina's don't have fingers is presumably because you can squeeze in more boats in the same space. The ratio boats/square miles will mostly probably much higher here in Europe because we have many boats and less space. See below a picture of our Marina. No fingers indeed for 95% of the berths. But I have to say that when in Europe marina's have to upgrade their berths, you see more and more finger berths. The average age of a boat owner is increasing and many want a bit more luxury, also from a berthing perspective. Our berth has a proper finger and when you are used to it (especially with the "gate" in the gaurding wire), you don't want ever getting back to a berth without fingers.  |
|
|
|
Post by Damen af Kungsholmen on Jan 27, 2021 17:49:10 GMT
  Missing text to earlier picture: With over 250,000 small islands available in one of the most beautiful archipelagos, you have to more with the bow to the cliffs. I have welded handles on the bowsprit. It has a built-in ladder and bracket for anchors and camera connected to the navigator in the Scanstrut pod to make it easier. Why Europeans often more with the bow may be that before we did not have bow thruster that makes it easier to more with the stern. This routine will probably die when next generation EU sailor will take ower? |
|
|
|
Post by zaphod on Jan 27, 2021 18:06:59 GMT
Missing text to earlier picture: With over 250,000 small islands available in one of the most beautiful archipelagos, you have to more with the bow to the cliffs. I have welded handles on the bowsprit. It has a built-in ladder and bracket for anchors and camera connected to the navigator in the Scanstrut pod to make it easier. Why Europeans often more with the bow may be that before we did not have bow thruster that makes it easier to more with the stern. This routine will probably die when next generation EU sailor will take ower? Yes I have seen that type of mooring before, but it is rare around here. We have a similar situation with deep water and sheer cliffs, but we tend to anchor from the bow and run a stern line ashore. We don't typically try to get directly from the boat onto land, we use a dinghy to go ashore. Different geography, different solutions I guess!  |
|
|
|
Post by dbostrom on Jan 30, 2021 8:29:11 GMT
Zaphod's stern tie mention (it sounds as though we sail in the same waters) reminded me of a tweak that's been very handy on our boat, is possible if you don't care to carry a life raft in the official life raft locker. Axle on two open stainless pole hangers supports 600' (183m) of line, hanger apertures angled aft so that too much tension (incorrectly) applied to the reel and axle will result in the assembly jumping out rather than tearing off (on balance seems preferable even though it may leave the reel swimming). The axle is a wood dowel appropriately treated with a piece of pvc electrical conduit slipped over it for low reel friction, the conduit being quite slippery in combination with the plastic reel. The conduit is segmented with butt splices confining the reel, so that it doesn't wander and jam against sides of locker when spooling out. Easily removed and stowed, if the entire locker is needed for something bulky. This tows out nicely, eliminates shenanigans with supporting the reel on a mop handle etc. (our previous method, via u-brackets on transom gate stanchions). Winding back is a matter of sitting on the transom step and some patience, of course. I've a crank and spooling guide affair in mind but as usual it's a matter of finding time to noodle, cut and try a bit.  |
|


