|
|
Post by nanus18 on May 18, 2020 12:43:25 GMT
Hi, I am planning to order a custom cabinet for the space under the sink / cooker gas, in my 795, allowing left access to the fuse area and right access to the rear of the 12v breakers.
Has anyone made a cabinet at this location?, any idea?
Thanks
|
|
|
|
Post by ihsan on May 23, 2020 9:39:51 GMT
Nanus18, here are my experiences with the locker under the sink;
İt is the biggest locker the boat has. It can be used for many purposes. There is already a factory installed AC supply there. Probably for installation of micro wave or water heater there. What I did was I installed some led strip lights inside. When I open the cabinet door the lights are instantly on. Inside the cabinet is like day light when opened.
As you know you can also demount the middle section that holds the two cabinet doors. Thus, when you have work inside you have space to crawl in do to any job there. It is also possible to put in a small outboard engine there, The new ones technically allow you to store upside down or face down. I did put in 2,5 Yamaha short shaft which is for the tender, and it fit in well. The head was on the right tail was on the right of the cabinet in down position. I moved the plastic fuse or electrical box on the right side a little to give more head space to Yamaha. Even with Yamaha engine in the cabinet you have enough space for any storege items. For storing I use plastic boxes. I think I have 6-7, mostly kitchen utensils and daily consumed items. These have their lids and can be stored side by side and on top of each other.
Finally, box storage system works for me well at the this time. It gives flexibility to use the cabinet space according to needs.
I also removed the Yamaha to the head. I found out that you can store it firmly there pretty well. This time the engine in up position with a little recline. Suprise is that It does not limit you there. You can use your toilet and your sink with no disturbance. Your can reach your shelves too. One hook is enough to make it firm there, because it fits in the place. I tried it in rough sees, it created no problem so far.
|
|
|
|
Post by fritz on Jul 6, 2020 19:15:36 GMT
After spending three days on my NC795, re-working the under sink cabinet has moved to the top of my list.
Any thoughts on moving the 110 shore power (fancy BlueSystem's panel) and the 12v fuse blocks to face out under the cabinet's chair? Has any one found or seen a 12v fuse panel that could be surface mounted like the one 110 panel?
Tentative plan... mount them behind the fiberglass with a black plexiglass door, like what is done with the battery switches and windless breaker. In my mind it would be more accessible and it would open up the space under the sink/stove. I might also move the the windless solenoid, it's barely accessible without crawling under the sink.
I am thinking a two drawer configuration as an insert that could be removed if needed.
Top drawer - like a kitchen cabinet drawer for sliver ware
Bottom drawer - the rest of the space
Both drawers would have removable dividers.
Thoughts/concerns?
|
|
Rob
Junior Member

Posts: 15
Jeanneau Model: NC 795
Yacht Name: AWARD ONE
Home Port: Sassafras River, MD
Country: USA
|
Post by Rob on Feb 12, 2024 17:57:57 GMT
Hi, I am planning to order a custom cabinet for the space under the sink / cooker gas, in my 795, allowing left access to the fuse area and right access to the rear of the 12v breakers. Has anyone made a cabinet at this location?, any idea? Thanks |
|
Rob
Junior Member
Posts: 15
Jeanneau Model: NC 795
Yacht Name: AWARD ONE
Home Port: Sassafras River, MD
Country: USA
|
Post by Rob on Feb 12, 2024 20:21:05 GMT
This is what I made for our 2019 NC795. I cannot figure out how to attach these pictures without them rotating 90 degrees counter-clock-wise every time I attach them ?? I have attached pictures before and didn't have this problem. If anyone can help me I would appreciate it !!! In the mean time what you see as the bottom of the picture is really the left side. Anyway, the first picture is the left side of the cabinet under the sink. I cut the plywood door/cover over the fuses so I could mount my inverter on the stationary bottom and allow the top cover over the fuses to be removed. The shelf on the left side sits on the inverter. There are (4) "L" brackets on the right sided bolted together to make two supports that hold the shelf on the right side. The L brackets were drilled to make the right height for the shelf to be level with the height of the inverter. The shelf on the right side just sits in place with one screw, with the head cut off after it was screwed in the shelf, through a hole in each bracket to hold the shelf in place. The shelf can be lifted out to work on the hot water heater or gain access to wiring and plumbing.  The second and third pictures show the slide-out drawer, first pulled out and the second pushed in. Pulled out it comes all the way out to the refrigerator, pushed in it allows the cabinet door to shut and lock. The drawer is just a home made box with a full deep bottom and a small top shelf in the back that allows small rarely used items to be stored under the shelf. The drawer is mounted to pull out kitchen drawer roll-out slides from Lowe's or Depot mounted to the bottom of each side of the drawer. The slides are mounted to the boat with 2X3's, one mounted on it's side to one mounted flat (like an L). Make this (L) prior to mounting to boat, the upright mounted to the flat should be to the outside of the flat 2X3 and the drawer will be sliding over part of the flat 2X3. The sliding track mounts to the 2X3 that's mounted upright on it's side. Before mounting the tracks to the floor lay everything out to get the width and height correct, to include mounting the tracks to the drawer and to the 2X3"s. With everything fitted in place, slide the drawer all the way in and out to verify clearances. Then mount the flat 2X3 to the floor (watch the length of screws - plumbing under floor). The drawer is removeable by a catch on the slides just like all roll-out drawer slides. That gives access to the removable back board cover to the main power switches on the stern side and access to the area behind the drawer that I also added removable wood covers over plumbing and wiring which added a lot more storage area. 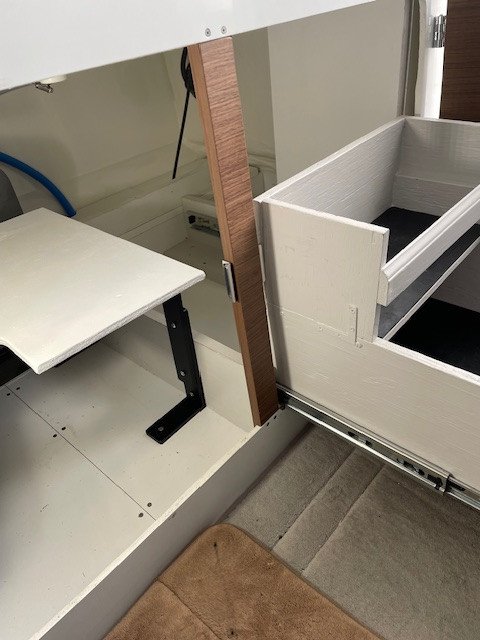  |
|


