|
|
Post by tedp on Feb 29, 2012 10:52:06 GMT
Due to the round-ups experienced in my SO32 I have been thinking of fitting a traveller for a long time. The discussion has been in several other threads: jeanneau.proboards.com/index.cgi?action=display&board=general&thread=1324&page=1jeanneau.proboards.com/index.cgi?board=per&action=display&thread=1898&page=1After due consideration I'm now in the process of fitting a rooftop traveller on the same principle and with components similar to those fitted on Flightdeck's boat (see first thread mentioned above). The part list has changed as some of the original components listed by Flightdeck are discontinued. I have used the following Harken parts: R32HB - 32mm CB rail, 150cms long T3242B - 32mm CB traveller car with stand-up toggle and 4:1 purchase 1849 - pair of pivoting track risers, to rise the track over the sprayhood front E3230 - 3:1 end control units 2466 - 40mm flat carbo air block 1986 - 44mm halyard block 2662 - 75mm swivel carbo block Working load of the rail and traveller car go up to 1265kg, working load of the 2662 block is 1100kg. This takes into account the mid-boom sheet arrangement - no skimping on the size of the rail. overview: 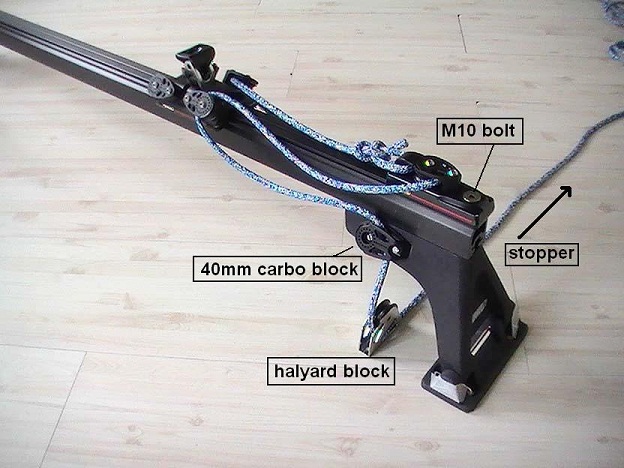 www.009dutch.nl/jeanneau/569_30_03_12_7_13_16.jpeg www.009dutch.nl/jeanneau/569_30_03_12_7_13_16.jpeg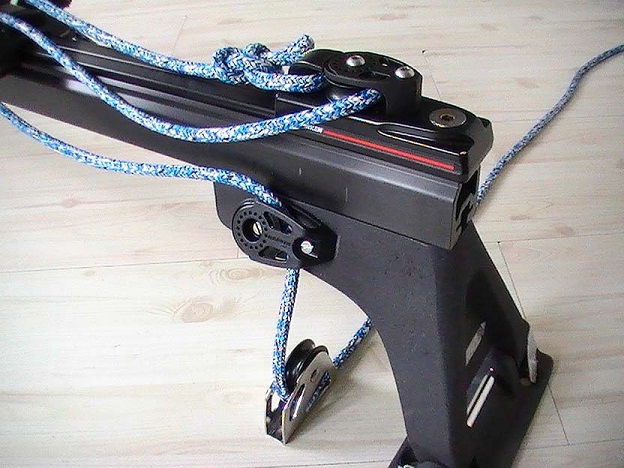 www.009dutch.nl/jeanneau/569_30_03_12_7_14_00.jpeg www.009dutch.nl/jeanneau/569_30_03_12_7_14_00.jpegAfter arrival of the order I measured the rail and the risers on the boat, and found out the rail can be used without shortening. The risers will be bolted to the roof and they will just clear the heads bulkhead - for reference consult Flightdeck's photos. In addition I will find a way to transfer some of the load to the original sheet block puttings on the roof. Last night I completed the rail by drilling 10mm holes in the ends to take the fitting bolts for the end control units. These have to be ordered separately - this size isn't readily available from yachting suppliers over here.  www.009dutch.nl/jeanneau/569_30_03_12_7_15_20.jpeg www.009dutch.nl/jeanneau/569_30_03_12_7_15_20.jpegIn addition I had to solve the problem of the missing dodger blocks no. 1982, which have been discontinued from the range. I fitted the 2466 blocks to the riser units as these are in the way of the control lines if you fit the blocks on the rail. This means the traveller cannot be pulled to luff all the way without the control lines getting a bit out of line, but for the remaining 3/4 of the length of the rail they will do all right. 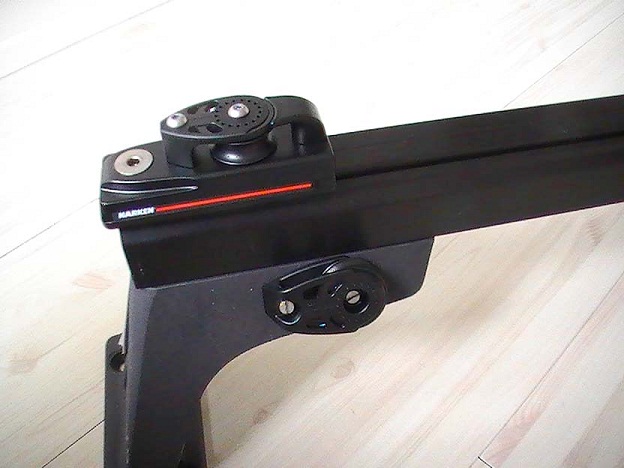 www.009dutch.nl/jeanneau/569_30_03_12_7_14_42.jpeg www.009dutch.nl/jeanneau/569_30_03_12_7_14_42.jpegI threaded two M5 holes into each riser unit to take bolts for the 2466 type carbo blocks. The riser units are heavy cast aluminium (I think) and the M5 threading went OK if pre-drilled with a 4.2mm drill. Next to do is have a set of steel backing plates made from a template I will draw using the base of a riser unit. 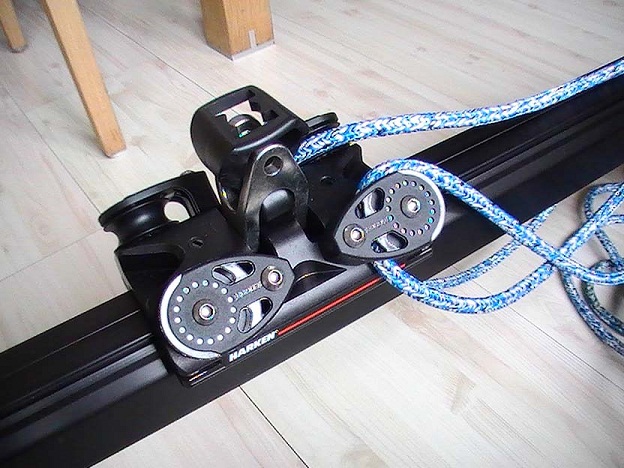 www.009dutch.nl/jeanneau/569_30_03_12_7_16_01.jpeg www.009dutch.nl/jeanneau/569_30_03_12_7_16_01.jpegI will keep you up to date on the fitting process. |
|
|
|
Post by tedp on Mar 1, 2012 16:57:36 GMT
Just like the traveller rail on Flightdeck's boat, I want to use the fixtures of the original sheet blocks to take as much of the load as possible. The Harken track risers will be bolted through the sandwich construction of the roof and I want to put minimal load on them. It will be enough if they prevent the rail from tilting when the sheet pulls from ahead, which is the case with the boom right out when the wind is on your quarter. The real load should be put on the spot where the U bolts are fitted for the original sheet blocks.
So together with the owner of the boatyard where Manokwari is laid up, we devised an idea to transfer the vertical pull on the rail to the original U bolts. An 8mm bolt will be put into the mounting slot in the bottom of the rail. On this a block of stainless steel (threaded M8) will be threaded, with two strips welded on. These will extend downwards and drilled to take an 8mm bolt through the U bolt on the roof. Turning this small assembly on the bolt inserted in the rail will set this exactly so the rail is lightly loaded downward, to counter the pull of the sheet block on the traveller carriage.
I hope you are still with me - as soon as I have the end result I will post a photo.
|
|
|
|
Post by flightdeck on Mar 1, 2012 21:23:34 GMT
Hi tedp,
Looks good, I like the new "car" with the blocks on the side, your bracing idea.....as I can follow it, sounds easy and simple yet strong, look forward to see pictures of finished project.
Cheers
|
|
|
|
Post by tedp on Mar 1, 2012 22:23:35 GMT
Hi Flightdeck Glad you like it! Here is a sketch diagram of the connection piece from the traveller rail ro the original U bolt sheet putting:  www.009dutch.nl/jeanneau/569_01_03_12_11_28_26.jpeg www.009dutch.nl/jeanneau/569_01_03_12_11_28_26.jpegIf you set the connection piece by turning it on the M8 bolt until it is slightly too short to fit the cross bolt in, at the bottom, you can loosen the U bolt putting nuts below deck, put in the cross bolt, then tighten the putting nuts. Thus you pre-tension the traveller rail just a little bit so the connection piece takes most of the strain, not the risers which are bolted through the balsa sandwich of the roof. At least that is the idea. EDIT - note that this idea was replaced by a milled device, see photos in further post. |
|
|
|
Post by tedp on Mar 12, 2012 19:31:11 GMT
Today we had glorious spring weather, about +15 C and a bit of sun, so I decided to fit the stainless steel bushes in the roof sandwich of my boat in preparation for adding the traveller rail to the roof. The bushes would be cut from a piece of 14mm stainless steel pipe, internal diameter 11mm. After careful measuring I drilled 3mm pilot holes to find the thickness of the roof which proved to be 22mm, give or take a tiny bit depending on the hole which I tested. The pilot holes then were used to take a 14mm bit, first from below to get a clean hole, then from the top right through, taking care to keep in a perpendicular line. The picture below shows the principle:  www.009dutch.nl/jeanneau/569_12_03_12_8_14_17.jpeg www.009dutch.nl/jeanneau/569_12_03_12_8_14_17.jpegAfter cleaning up the holes I cut 8 bushes from the pipe, using a hacksaw, and cleaned them up with a file and sandpaper. I fitted them 'dry' in the holes, with a piece of tape below to prevent them falling inside. After taking off any material still showing above the roof, I set to glueing them in with epoxy. I used an epoxy glue set that comes in a dual syringe, not the more usual liquid stuff. The glue sets even at night temperatures which are about +5 right now. After twiddling the bushes in their glue bath, I heated the lot with a hairdrier to start off the reaction, then covered the top with more tape. Now I'm waiting for the remaining stuff to arrive so I can install the rail and the traveller. |
|
|
|
Post by tedp on Mar 25, 2012 11:39:08 GMT
Well, about 10 days on I'm still waiting for the stainless steel parts needed to fit the rail to the cabin roof. Therefore I have posted two photos on the Dutch Jeanneau forum which can be viewed here. They show the holes drilled in the roof and the stainless steel compression bushes to prevent the sandwich from cracking. I ground a fraction of a mm off the bush where it reared its head above the roof surface. Note the extremely polluted surface - the boat is stored under the aircraft approach route to Amsterdam Airport. 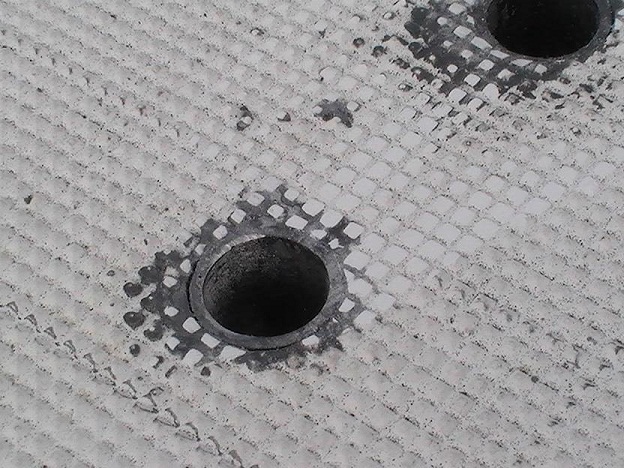 www.009dutch.nl/jeanneau/569_30_03_12_7_17_28.jpeg www.009dutch.nl/jeanneau/569_30_03_12_7_17_28.jpegBelow deck the heads ceiling looks like this, with four big holes for the port side track riser. These are bushed. The two small holes are for fitting the vertical block that will take the control line to the stopper under the dodger (sprayhood). 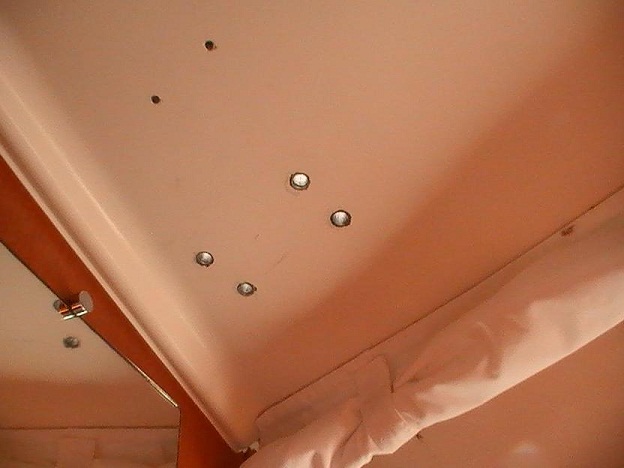 www.009dutch.nl/jeanneau/569_30_03_12_8_06_53.jpeg www.009dutch.nl/jeanneau/569_30_03_12_8_06_53.jpegYesterday I cut four M10 bolts to size, using a tungsten saw wire. An ordinary steel saw blade doesn't make an impression. I cut the bolts with a nut threaded on them - when you take it off again it will restore the thread on the bolt so you can clean it up with a file. |
|
|
|
Post by tedp on Mar 30, 2012 19:49:37 GMT
Over the past days I fitted the mainsheet track on the cabin roof. Apart from two setbacks that could be solved, this worked all right. I will first show you some photos, starting with an overview of the port side of the rail, with a temporarily fitted steering line. Note the tensioning device between the rail and the original sheet block fixture: 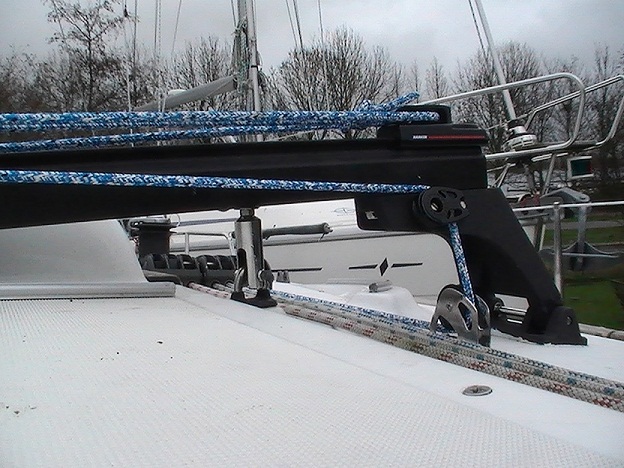 www.009dutch.nl/jeanneau/569_30_03_12_7_52_33.jpeg www.009dutch.nl/jeanneau/569_30_03_12_7_52_33.jpegNext, a close-up of the tensioning device which has been milled by a local machine shop, out of a piece of 25mm stainless steel rod, 60mm in length. In the top, an M8 threaded hole was made and in the lower half a slot was milled with a transverse 8mm hole to take a rigging bolt. The device is fitted to an extra M8 bolt slid into the track with a backing plate inside. A nut and plate washer lock it up to the rail after fitting: 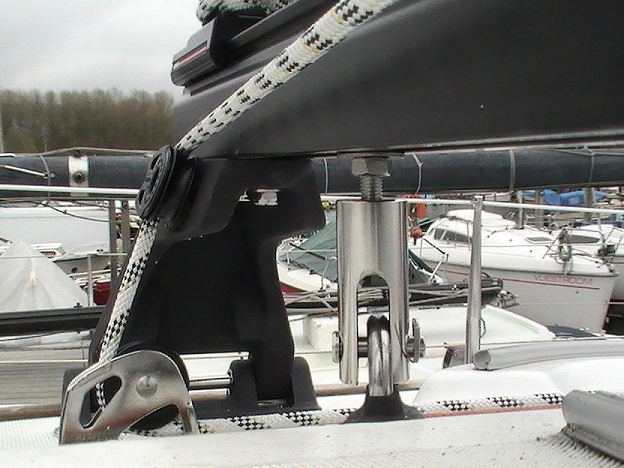 www.009dutch.nl/jeanneau/569_30_03_12_7_53_13.jpeg www.009dutch.nl/jeanneau/569_30_03_12_7_53_13.jpegA general overview showing the way the sheet was re-rove, with the standing part on the middle eye under the boom instead of the last one. This reduces the tendency of the lower block on the carriage to slew:  www.009dutch.nl/jeanneau/569_30_03_12_7_53_52.jpeg www.009dutch.nl/jeanneau/569_30_03_12_7_53_52.jpegThe temporary steering line has a stopper knot to prevent the carriage from slamming into the end control unit: 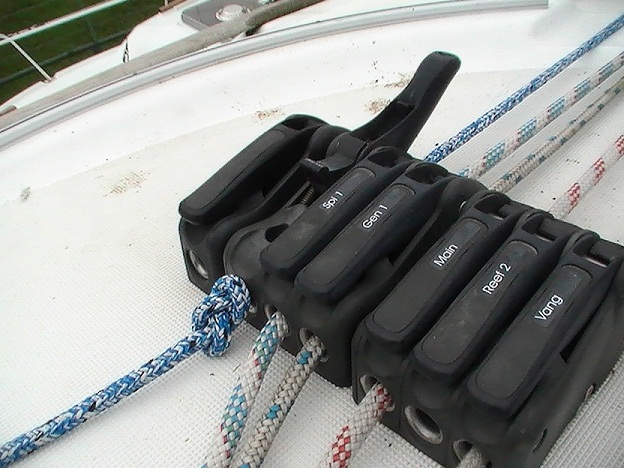 www.009dutch.nl/jeanneau/569_30_03_12_7_54_47.jpeg www.009dutch.nl/jeanneau/569_30_03_12_7_54_47.jpegThe end control unit is fitted on the rail with an M10 bolt going right through the bottom of the rail, but with a locking nut inside the hollow rail. This went (just) right on the port side, but ended in troubles at the other end (see below): 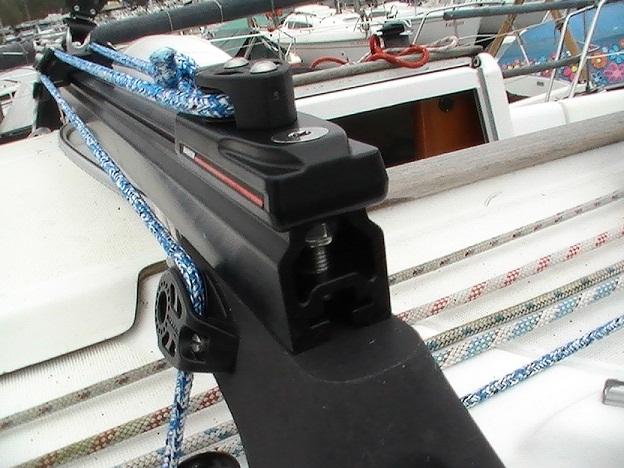 www.009dutch.nl/jeanneau/569_30_03_12_7_56_38.jpeg www.009dutch.nl/jeanneau/569_30_03_12_7_56_38.jpegFinally, a view of the ceiling in the heads, with the bolts of the portside track riser fitted through a 4mm stainless steel plate, and the bolts of the vertical block through a 2mm strip. The latter have been fitted with plastic nut caps: 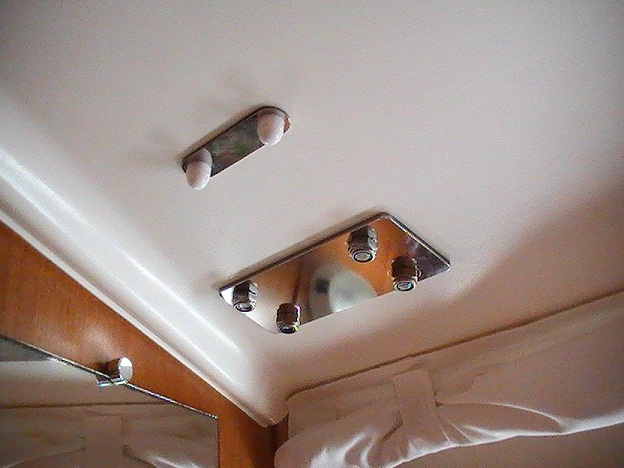 www.009dutch.nl/jeanneau/569_30_03_12_7_55_39.jpeg www.009dutch.nl/jeanneau/569_30_03_12_7_55_39.jpegFinally, some notes on fitting the track and what went wrong: Fitting the track risers on the prepared holes went all right. I mounted them on the rail with the steel tilt rods in place on the risers so all would be aligned. On the port side I couldn’t line up the milled tension fitting with the U-shaped sheet block fixture on the roof as the assembly sat too far forward. So I loosened the bolts on the riser and ran a line round it. A turn on the winch pulled it a fraction astern and lo and behold, the tension piece could be slid in place! I then tightened up all the bolts and all was well. The tension pieces were connected to the sheet block fixtures after turning them up about 3mm too high on the extra M8 bolt fitted in the base of the track. Loosening the U-shaped fixtures below deck, using a spanner, made them rise enough to be able to slide a rigging bolt through the U bolt and the tension piece. Re-tightening the sheet fixtures below deck resulted in slight popping noises from the roof, as if the mainsheet was taking the load. Finally I tightened the nut and carriage ring on the M8 bolt against the base of the track. Fitting the end control units to the track went (just) right on the port side, as the self locking M10 nut inside the rail end on the bolt from the top ran very heavily. I packed the space inside the rail with iron strip until the bolt turned without turning the nut. On the starboard side the nut locked on the bolt completely and I had to drill the b***** to pieces with a hard steel drill until it would budge. The bolt proved to have a seized thread – next Monday someone will cut off the damaged end and weld on a new M10 rod. In hindsight I should have put a threaded M10 hole into the rail itself, that would have spared me a lot of trouble... Next will be sailing trials, as soon as the boat is in the water, about a fortnight from now! To be continued… ;D |
|
|
|
Post by tedp on May 1, 2012 9:51:47 GMT
Yesterday I had my first sail with the new traveller arrangement, after having been dogged by autopilot troubles for a fortnight. In the end I took advantage of a patch of fine weather to get the boat across a 25-mile exposed stretch of water, single-handed with nothing but a steering line on the tiller so I could safely hoist sail. I only sailed in light winds, about 10-11 knots max, but the improvement in sail shape was remarkable. The boat can lie closer to the wind and the foresail luff will now be the first to bulge back instead of the main. In light winds I can pull the boom to the centreline and induce a nice bit of twist to the sail. The rudder felt quite balanced all the way, but I will have to sail in more wind first before I can say more. The expense of going for ball-bearing blocks and traveller carriage was well justified as I can easily slide the carriage back and forth with nothing but a 4:1 purchase, under full main with an 11 knot wind. This stuff runs very sweetly indeed. I also find I can easily reach the traveller lines under the hood (dodger), leaving the tiller alone for a few seconds. Here are a few photos - first one shows the traveller pulled to luff in very light wind, about 6 knots: 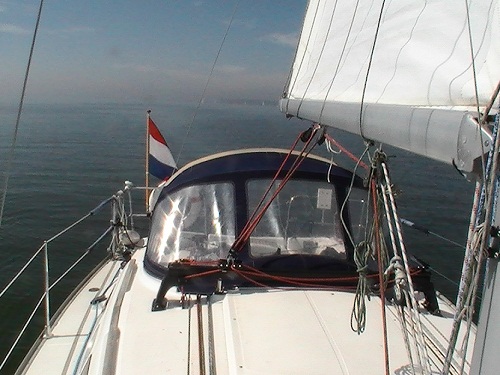 www.009dutch.nl/jeanneau/569_30_04_12_5_05_36.jpeg www.009dutch.nl/jeanneau/569_30_04_12_5_05_36.jpegNext one shows the twist in the main, with the boom on the centreline of the boat:  www.009dutch.nl/jeanneau/569_30_04_12_5_02_46.jpeg www.009dutch.nl/jeanneau/569_30_04_12_5_02_46.jpegUnder very light conditions, the boat could lie as close as 30 degrees to the wind and kept going at a knot and a half, with the sails just filled. In a 10 knot wind, the boat wouldn't lie closer to the wind than about 45 degrees, running at three knots. Easing the rudder to about 50-60 degrees off the wind caused an immediate pick-up of speed. This is true wind as returned by the instruments. Boat speed was clocked from GPS. |
|
|
|
Post by flightdeck on May 3, 2012 21:34:03 GMT
hi Tedp,
Looks like a job well done and thought thru. Funny you said autohelm problems, I have just fitted the Jefa autohelm system, will be testing over the weekend, never had an autohelm before. Sorry back to the rooftop traveller looks great and I'm sure you will be pleased + you will not have to work the vang so hard.
Cheers
|
|
|
|
Post by tedp on May 4, 2012 8:32:26 GMT
|
|
|
|
Post by tedp on May 28, 2012 20:55:35 GMT
|
|
orion
Full Member
  
Posts: 46
|
Post by orion on Sept 19, 2013 15:49:18 GMT
Hi tepo
looks like I gave MartyB instead of yourself the praise for the mainsheet traveller project, apologies for that. So congrats on a job well done.
ORION
|
|
|
|
Post by tedp on Sept 20, 2013 10:36:01 GMT
Thanks, Orion. No problem.
The total cost of the hardware needed was considerable - if I remember correctly way over €1500, much of which went into the two riser units. However they have proved to be of excellent quality.
The original idea wasn't mine however, it was described by Flightdeck, another SO32 owner on this forum. I copied the set-up, only inserted stainless steel bushes into the fixtures to avoid compression damage to the cabin roof.
|
|
orion
Full Member
  
Posts: 46
|
Post by orion on Sept 26, 2013 16:51:36 GMT
Thanks tepo,
1,500.00 is more than I thought it would be but it still may be worth doing.
Thanks to everybody who contributed.
Regards
ORIOn
|
|
|
|
Post by tedp on May 30, 2016 13:50:49 GMT
Thread updated after re-hosting the photos, May 30, 2016.
The photos had disappeared due to the demise of the Dutch language Jeanneau forum.
|
|


