|
|
Post by panoramix on Dec 28, 2013 1:20:40 GMT
When i had my boat surveyed in 2010 in Gibraltar for the insurance company, the surveyor noticed cracks between the bottom and the beam. The surveyor advised me to strengthen this area with a few layers of fiberglass. I followed up on his advise and applied several mats of fiberglass. It seems that this is a general problem with boats and bulb keels. The heavy bulb and the long arm generate large forces on the hull where the keel is bolted onto the bottom. Depending on the design these forces will lead to cracks and eventually to some kind of disaster.  www.panoramixopzee.nl/pictures/first%20cracks.jpg www.panoramixopzee.nl/pictures/first%20cracks.jpgThis is how it started out. Just a small cracked line. After crossing the ocean to Barbados i already noticed that cracks had developed in the new layers of fiberglass. I ignored the problem until in 2013 when the front keel bolt started to leak a bit. Inspection of the cracks in the fiberglass repair now learned that the bottom was a few millimeter separated from the beam. During sailing i could feel the keel bolts move in regard to the beam. I decided to invent a permanent solution for this problem. In 2014 i want to sail my boat over the ocean back to Europe and i don't want to lose the keel during that trip!  www.panoramixopzee.nl/pictures/drop%20of%20keel.jpg www.panoramixopzee.nl/pictures/drop%20of%20keel.jpgNew cracks in the repaired part and the keelplated drop a few mil. I designed a steel frame to replace the plates that now hold the keel bolts. The frame is then bolted on the beam. So now when the keel wants to swing it has to break out the complete beam, which i think will not happen as this beam is glassed in over a long stretch. In Guatamala i had these steel frames made by a local workshop. I could lay my hands on a plate of 9/16" steel. The bottom plate is double and the plate attached to the beam is single. The plate is 2 feet (~60 cm) wide and a bit curved to follow the beams arc. This size of frame can be positioned on the beam without breaking all the floorboards. Two of these steel frames were made to match each other on both sides of the beam. I drilled a lot of holes thru and thru for several 3/8 (~9mm) studs to clamp the two plates onto the beam. The boat needs to be out of the water to do this job. You have to partially unbolt the keel and you want the hull pressed on to the beam (squeeze the few mills opening between the hull and the beam).  www.panoramixopzee.nl/pictures/Steel%20keel%20frame.JPG www.panoramixopzee.nl/pictures/Steel%20keel%20frame.JPGNew designed keelplates to hold the center four keel bolts. The steel frames were put in place while bedded in four layers of fiberglass still wet. By this means the plates will spread their loads evenly on the existing hull and beam. The steel frames are not stainless steel because that would be less strong and way more expensive. The steel frames where zinc coated and glassed in. All corners are made waterproof with Sikaflex sealant.  www.panoramixopzee.nl/pictures/5/Guatamala%20Rio%20Dulce%20laswerk%20kiel.jpg www.panoramixopzee.nl/pictures/5/Guatamala%20Rio%20Dulce%20laswerk%20kiel.jpgNew frame glassed and bolted in place I will keep this topic updated if this construction still holds by the time the boat has arrived in Portugal (summer 2014) |
|
|
|
Post by sailbleu on Dec 28, 2013 15:12:53 GMT
Hey Panoramix ,
I was wondering , I've read the complete story about your endeavour going to the Caribean and so on.I remember you telling us about a strange encounter nearby Gibraltar , where your boat , while sailing along , just stopped without any obvious reason what so ever. I also remember the backstay was damaged due to this encounter , atleast that was your theory no ?
Could it be that you did hit a (sleeping) whale with the keel and therefor damaged the keel suspension ?
It's just that maybe the keel cracks are caused by this collision and not perse construction fault ?
Regards
Edit:
nice repair , well done.
|
|
|
|
Post by panoramix on Dec 29, 2013 2:33:04 GMT
Hi Sailbleu,
you have a good memory and yes we most likely hit a whale near Gibraltar, but that was after the survey.
For now i think the cracks develloped because we use the boat more than the average sailor/owner.
With this post i want to see if there are more owners with cracks near the keel bolts. And if so how they dealt with it.
|
|
bart
New Member
Posts: 7 
|
Post by bart on Dec 30, 2013 10:40:14 GMT
Hi Panoramix,
I'm also an owner of a SO 37 and cracks are also visible in the same location (although smaller in size). The log is now at 16000 Nm, I own the boat since 2006 and at that time the log was at 1900 Nm. I'm planning to look at the problem during this winter.
Regards
Bart
|
|
|
|
Post by davideso37 on Jan 9, 2014 12:12:55 GMT
Hi Panomix, I also have a Sun Odyssey 37 and after reports of cracks around the keel frames on a Sun Fast 37 decided to upgrade my keel floors before any problems developed. In consultation with a naval architect we settled on three additional keel floors of the same size as the existing three and an additional backing plate with two additional keel bolts. In the process we added about 8mm of fibreglass to the floor to increase the sheer resistance. After installing the three new floor and the two new keel bolts we lifted the most stressed backing plates and discovered a very small amount of cracking due to the separation of the frame moulding from the hull moulding where the frames are bogged in. The flange of the frame was removed where the cracks were present and the frames reglassed to the hull with about 8mm of fibreglass so that all the frames are now considerably thicker than the original and the frames in the highly stresed areas are now glassed directly to the hull rather than being attached with bog. As you can imagine this was a major undertaking which required cutting our the plywood sub floor to get access to the whole keel area. While the whole floor out to the sides of the seats is thickened the area under the backing plates is thickened up to the point where there is no spare thread above the nuts on the keel bolts. This has the added advantage that the keel bolt backing plates out of the bilge water (which we get from withdrawing the speed sensor every week). I have diagrams and photos if you are interested but I see you have addressed your concerns in a different manner. The way I have addressed it is to have a frame on each side of the backing plate so that the stresses are carried by two frames, the glass is thicker and the new frames are glassed directly to the hull moulding. The additional bolt help to spread the load but were intended as additional strength to allow for the wings we have fitted to the bulb. There are a couple of photos of the additional frames on my boat blog at www.3gwiz.com.au/passion/blog/?p=855These shows the frames prior to lifting the existing backing plates and adding the extra glass under the plates and up the sides of the frames and also before we installed the additional backing plate and keel bolts. A photo of part of the finished job is here.  Regards David |
|
|
|
Post by panoramix on Jan 13, 2014 16:34:52 GMT
Well it looks like there are more boaters with this problem. The repair with 8 mm fiberglass will be very strong, similar to my repair with the steel frame.
Bart, can you upload a picture of your cracked area? The crack on my boat started also very small and i dont have a picture of that.
To avoid seawater in the bilge from the speedsensor, i manage to get it going again by turning it backwards/forward while making good speed.
|
|
|
|
Post by sailbleu on Jan 13, 2014 17:20:54 GMT
Well it looks like there are more boaters with this problem. The repair with 8 mm fiberglass will be very strong, similar to my repair with the steel frame. Bart, can you upload a picture of your cracked area? The crack on my boat started also very small and i dont have a picture of that. To avoid seawater in the bilge from the speedsensor, i manage to get it going again by turning it backwards/forward while making good speed.[/font] Great tip panoramix , for sure I will try this procedure next time . Regards |
|
|
|
Post by davideso37 on Jan 17, 2014 6:46:00 GMT
Re the speed sensor, the through hull has a spring to start the flap closing. My spring has failed and will be replaced at the next haul out but even with the spring in good order and closing the flap promptly there is still a little water that gets into the hull.
Anyway at the next haul out check that the spring is still there.
Regards
David
|
|
bart
New Member
Posts: 7
|
Post by bart on Jan 17, 2014 16:16:57 GMT
Panoramix, Sorry for my late reply, but I had to go to my boat to take the photo's of the cracks close to the keel plates. As you can see the cracks first appeared in the gel coat (first and second picture). I removed the gel coat in some spots and it looks like there is a lack of glass, the glass fibers are still visible (third picture). I assume that this phenomena is due to the fact that the tensions has been to high locally. 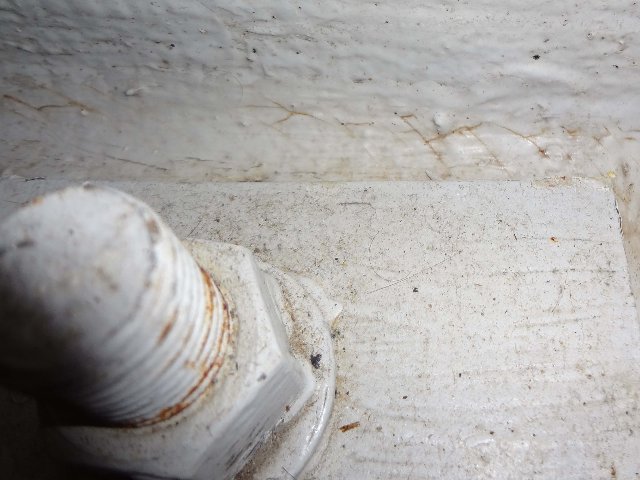   Your solution (adding the steel plates) looks very strong and safe to me! Kind regards Bart |
|
|
|
Post by asdeguia on Feb 7, 2014 16:59:46 GMT
Hy Panoramix
I think that the plates are a very good solution.
I have a SO 37 too. Could you please give us the measures of the new keel plates?
Thanks
|
|
jaminb
Junior Member

Posts: 23
|
Post by jaminb on Feb 14, 2021 12:33:46 GMT
Hello Forum
We are due to join the Jeanneau Owners club next week when we complete on the purchase of 2006 SO 37.
The acquisition survey has revealed 3 hairlines cracks in the bilge around the keel bolt area. No problems were identified on the externals, no damage to the keel and a tight joint between hull and keel. I have had quotes to remove the saloon, grind out the bilge area and apply new layers of laminate. This work goes way beyond the surveyors original recommendation to grind out and establish the depth of the cracks - this has been done and the crack do not go beyond the flow coat layer.
I would appreciate the forums wisdom and recommendation. (a) Leave well alone and look forward to the sailing season (b) carry out the work above as recommended by two boat yard (and now the surveyor) (c) go the whole nine yards with the Panoramix or Davideso37 solution.
thanks
Ben
|
|
bart
New Member
Posts: 7
|
Post by bart on Feb 14, 2021 13:16:24 GMT
Hi Ben, I posted some pictures earlier about this problem. In my case we tried to grind out the cracks but discovered that the cracks continued in the bottom laminate of our boat. The cracks in the bottom continued from about 15 cm horizontally from every rib (on both sites). Maybe following the advice of the surveyor to grind out the cracks is a good idea. During the grinding you can see if the laminate is still solid (if not it will look yellow and is very brittle). I started investigating the problem by removing the gel coat with a screw driver at the location of the cracks. I discovered that the laminated was very brittle and easy to remove with the screwdriver. Later when the floors were removed the grinding started in the corner between the ribs and the bottom of the boat. The yard then discovered that the cracks were continuing in the bottom for at least 15 cm. After removing all the cracks and the splintered laminate new laminated was brought up (more than the original layers) and 4 extra beams were added around the keel area next to the keel. These 4 new beams (or ribs) are connecting the original 3 ribs. I will try to upload some pictures.
Kind regards
Bart![]() ![]() |
|
bart
New Member
Posts: 7
|
Post by bart on Feb 14, 2021 13:33:38 GMT
|
|
bart
New Member
Posts: 7
|
Post by bart on Feb 14, 2021 13:36:43 GMT
Hi Ben,  This is a picture of 2 of the 4 additional ribs in the keel area. Bart |
|
jaminb
Junior Member
Posts: 23
|
Post by jaminb on Feb 14, 2021 14:35:45 GMT
thanks Bart very comprehensive and helpful response. A couple of extra questions if I may.
If not grounding damage why do the cracks occur? Do you think it is a fault in the original design / manufacture?
Would you recommend adding the additional ribs regardless of the current state of cracking - is it only a matter of time before it gets worse?
What material are your additional ribs made of?
Thanks
Ben
|
|
bart
New Member
Posts: 7
|
Post by bart on Feb 14, 2021 15:50:01 GMT
The cracks in our boat came some time after a grounding. In my opinion the design is minimal. If you are sailing the keel will try to keep your boat upright and therefore put forces on the bottom part of the hull. This part of the bottom around the keel will bend a little. This movement will put a continually changing load on the laminate connecting the bottom and the ribs.
When you run a ground the keel suddenly stops. The back of the keel will move upwards and the front downwards. The keel is only bolted to the bottom, and the bottom will suddenly be stopped as well. Because the entire boat is still moving forward the laminate between the bottom of the hull and the ribs will have to deal with the forces of running a ground.
When the laminate between the bottom and the ribs is damaged (as it was the case on our boat) the forces of the keel on the bottom will make the bottom flex (during sailing). Because the laminate between the the bottom and the ribs is damaged the cracks will grow and grow and will extent in the bottom laminate. Think about the bottom part of the hull as a few layers of kart-board with the keel bolts protruding. If you are sailing over sb and then tack to port the keel will try to move the bolts. This will put a force on the laminate next to the keel bolts. The top layers and the bottom layers of the bottom(think of the kart-board) will try to move in a opposite direction. These forces will create the delamination in the bottom of the hull (at least this is my opinion).
When our boat was repaired I asked the shop to put extra layers of laminate in the bottom part and in the corner between the ribs and the bottom. This because to my knowledge this is a weak spot. Apart from this I payed extra for installing the 4 ribs around the keel. The are made of a foam core, with layers of laminate covering the core. If you run aground they will help dividing the loads from the keel area to the ribs (this is my personal opinion), because the area connecting the bottom around the keel and the ribs is much larger.
We have bought our boat in 2005 (build in 2001), and used in extensively. We sailed fi around England, to the north of Norway, to Finland and to the Med. The problem with the cracks never came back.
My advice is:
1. Check all the connections between the ribs and the bottom part of the hull.
2. Check the area at the front of the keel and at the back of the keel.
3. Check the holes in the ribs. In our boat Jeanneau did a poor job and the wood (inside the ribs) was not sufficiently covered and was very wet.
4. Check the bilge. In our boat there was a crack in the bilge because they used a screw to attach the switch operating the bilge pump. The crew was protruding the laminate totally and there was a crack around the screw.
Although we had the above mentioned problems with our boat, which where mostly covered by the insurance, I still think its a great boat. We now own it for 15 years and made a lot of safe miles!
Regards
Bart
|
|
|
|
Post by ianpowolny on Feb 14, 2021 18:22:53 GMT
Ben,
Have you considered the situation with your insurance company. Over the past few years there have been a number accidents due poor/improper keel repairs and maintenance. Our insurance company has written in to the policy policy inspection at every grounding at the insurers cost. Have you spoken to your insurance company?
If you are buying the boat why is this repair at your cost? We thought we had cracks at the bow of our boat when we bought it and the repair was at the previous owners cost although we split the cost with him.
Ian
|
|
bart
New Member
Posts: 7
|
Post by bart on Feb 15, 2021 8:47:08 GMT
Hi Ben,
If the area around the keel has been inspected and no more cracks showed up, than I personally would not worry. The few cracks that the inspector found where removed and did not go beyond the gel coat. I personally would just enjoy the boat and go out sailing. You can check the keel area in the bilge fi every year to make sure everything is still ok. If the boat is hoisted out of the water you also can check if the keel is moving. If problems show up after grounding or after thousands of miles its early enough to start to remove the interior.
Bart
|
|
jaminb
Junior Member
Posts: 23
|
Post by jaminb on Feb 15, 2021 10:12:15 GMT
thanks Bart
Ian good point on insurance but as not accident damage I don't expect the insurer to be interested.
|
|