Vetus COMFL1230 shaft coupler, Chapters 1 & 2
Jan 17, 2021 22:49:43 GMT
Post by dbostrom on Jan 17, 2021 22:49:43 GMT
I've been meaning to update the forum on this matter for several months now. This could perhaps go in the "hints and tips" area. Particularly chapter 2 may be worth flagging.
Chapter 1
Background: in 2017 the dripless seal on our SO39ip needed to be replaced. Without going into too many details, the cost-optimized OEM coupler supplied with the prop shaft was not removable. The situation strongly indicated an upgrade, time was of the essence, and a replacement part would have to address loss of shaft length due to slicing off the old coupler.
Product: The "Vetus COMFL1230" addressed the preface above. Thanks to a little serendipity in dimensions, this part allows the old coupler to be cut off and due to its construction "adds back" the lost length, with a short bit to spare for fitting purposes (there's a bit of extra length to play with, which makes cutting the shaft less of a frightful proposition).
As well, and this is key, this is a split coupler which means "stuck" is a thing of the past. There is absolutely no sense in retaining a one-piece couplera after the first time it's necessary to get it off the shaft. "Stuck" is nearly inevitable and life is too short to spend on removing fused couplers. I'm not sure how many if any Jeanneaus are made with shafts at this point, but if I were the owner of a fresh boat I'd swap couplers immediately, before seizure happens.
A side benefit of this coupler is that it absorbs up to 2 degrees of misalignment. I suppose this should not be taken as an invitation to stop paying attention to alignment. For our boat there is a rumor that overdoing the backstays can throw the shaft out of alignment. I don't believe that's significantly true, but still the backstop is a comfort.
Measurement: the new Vetus coupler absorbs a certain amount of length within the clamping portion. Ahead of that are several centimeters of additional coupler structure. The length of the shaft needs to end up with the prop in the right position and with the coupler flanges ready to mate, after pulling the shaft forward to its normal position. Measure carefully, do the arithmetic carefully, then do it all over again. There needs to be absolute certainty on where to cut.
Cutting: On advice from an old hand, I did not use a power tool with a carbide blade to cut off the old coupler, as apparently the nitrides in a typical cutting disk will rapidly alloy with the stainless, causing cutting to become extremely slow.
As well, using a disk cutter in this situation (shaft in "alley") is an invitation to a nasty injury and will certainly make a hell of a mess.
Instead, I used a quality nitride-free blade in a hacksaw to accomplish the cut. Given the location, the stroke on the saw is short. Even so, the actual time spent cutting the shaft proved to be only ~25 minutes, with total time including resting tired arm about 40'.
Even though it's not a critical matter, the cut should be as close to perpendicular to the shaft as possible, a weakness of a hack saw. More by luck than skill, my cut ended up with a degree or so of true. For the picky, I think it would be possible to fashion a guide out of a semicircle of other material placed over the shaft.
After making the cut, use a file to thoroughly dress the freshly cut edge of the shaft, so that burrs don't become annoying when sliding on the new coupler.
Fitting: A piece of cake but see chapter 2. Simply follow the Vetus instructions. Vetus called for a torque and I was lucky; my torque wrench happened to fit in this space.
Results: Excellent. It wasn't an objective for me, but the coupler does (as promised) reduce noise and (especially the higher frequency) vibration from the shaft. This was never obnoxious but it's still noticeable when gone.
More importantly, the coupler paid off exactly as anticipated the very next year, when I had to fly in to where the boat was located on a light aircraft with a scanty subset of tools and and a spare transmission, to swap out the failed unit. "Failure was not an option" on this mission, and knowing and then confirming that the coupler was the least of worries as opposed to the main worry was a huge benefit, hard to describe short of living the experience.
Chapter 1 is a solid win; chapter 2 should not dissuade somebody from doing this modification, with one important caveat which will be addressed shortly.
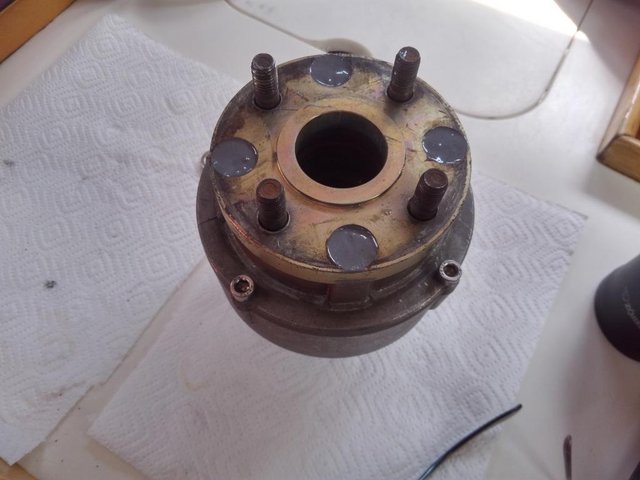
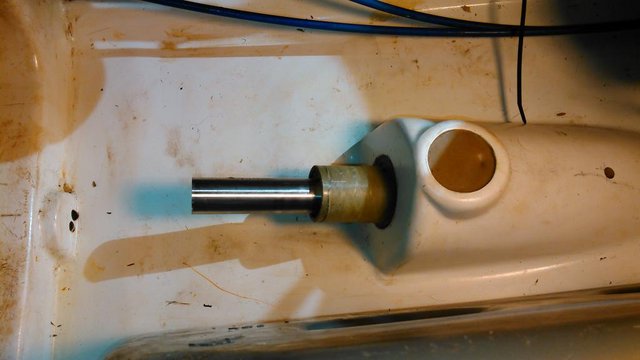
Photos: cut shaft (as a ray of hope for those thinking about cutting), shaft with project complete.

Chapter 1
Background: in 2017 the dripless seal on our SO39ip needed to be replaced. Without going into too many details, the cost-optimized OEM coupler supplied with the prop shaft was not removable. The situation strongly indicated an upgrade, time was of the essence, and a replacement part would have to address loss of shaft length due to slicing off the old coupler.
Product: The "Vetus COMFL1230" addressed the preface above. Thanks to a little serendipity in dimensions, this part allows the old coupler to be cut off and due to its construction "adds back" the lost length, with a short bit to spare for fitting purposes (there's a bit of extra length to play with, which makes cutting the shaft less of a frightful proposition).
As well, and this is key, this is a split coupler which means "stuck" is a thing of the past. There is absolutely no sense in retaining a one-piece couplera after the first time it's necessary to get it off the shaft. "Stuck" is nearly inevitable and life is too short to spend on removing fused couplers. I'm not sure how many if any Jeanneaus are made with shafts at this point, but if I were the owner of a fresh boat I'd swap couplers immediately, before seizure happens.
A side benefit of this coupler is that it absorbs up to 2 degrees of misalignment. I suppose this should not be taken as an invitation to stop paying attention to alignment. For our boat there is a rumor that overdoing the backstays can throw the shaft out of alignment. I don't believe that's significantly true, but still the backstop is a comfort.
Measurement: the new Vetus coupler absorbs a certain amount of length within the clamping portion. Ahead of that are several centimeters of additional coupler structure. The length of the shaft needs to end up with the prop in the right position and with the coupler flanges ready to mate, after pulling the shaft forward to its normal position. Measure carefully, do the arithmetic carefully, then do it all over again. There needs to be absolute certainty on where to cut.
Cutting: On advice from an old hand, I did not use a power tool with a carbide blade to cut off the old coupler, as apparently the nitrides in a typical cutting disk will rapidly alloy with the stainless, causing cutting to become extremely slow.
As well, using a disk cutter in this situation (shaft in "alley") is an invitation to a nasty injury and will certainly make a hell of a mess.
Instead, I used a quality nitride-free blade in a hacksaw to accomplish the cut. Given the location, the stroke on the saw is short. Even so, the actual time spent cutting the shaft proved to be only ~25 minutes, with total time including resting tired arm about 40'.
Even though it's not a critical matter, the cut should be as close to perpendicular to the shaft as possible, a weakness of a hack saw. More by luck than skill, my cut ended up with a degree or so of true. For the picky, I think it would be possible to fashion a guide out of a semicircle of other material placed over the shaft.
After making the cut, use a file to thoroughly dress the freshly cut edge of the shaft, so that burrs don't become annoying when sliding on the new coupler.
Fitting: A piece of cake but see chapter 2. Simply follow the Vetus instructions. Vetus called for a torque and I was lucky; my torque wrench happened to fit in this space.
Results: Excellent. It wasn't an objective for me, but the coupler does (as promised) reduce noise and (especially the higher frequency) vibration from the shaft. This was never obnoxious but it's still noticeable when gone.
More importantly, the coupler paid off exactly as anticipated the very next year, when I had to fly in to where the boat was located on a light aircraft with a scanty subset of tools and and a spare transmission, to swap out the failed unit. "Failure was not an option" on this mission, and knowing and then confirming that the coupler was the least of worries as opposed to the main worry was a huge benefit, hard to describe short of living the experience.
Chapter 1 is a solid win; chapter 2 should not dissuade somebody from doing this modification, with one important caveat which will be addressed shortly.
Photos: cut shaft (as a ray of hope for those thinking about cutting), shaft with project complete.