|
|
Post by timo on Apr 26, 2020 15:00:52 GMT
Hi,
I would appreciate tips for changing centerboard keel lifting rope. I cannot find any service hatch to reach end of the rope in order to replace it.
|
|
|
|
Post by MalcolmP on Apr 26, 2020 15:22:14 GMT
|
|
|
|
Post by timo on Apr 27, 2020 4:50:18 GMT
Thanks, unfortunately those topics are related to more recent boats, my Sun Rise is from 1986. The centerboard system looks different.
|
|
|
|
Post by rene460 on Apr 27, 2020 12:03:34 GMT
Hi Timo,
Our SO30i also has a lift keel, but it is almost certainly different from yours. However working on ours, I would say there are some basic principles that might help with a place to start.
First, for the system we have, and the few others which I have seen drawings, it is not advisable to try and replace on the water. When on the hard stand, have the boat yard support the boat on high trestles (as they would for a fixed keel) so you can let the keel down.
Then you can let the rope further, but make sure you don’t loose it at the top, and you might be able to see the attachment point and the lower end of the rope, at least for inspection. The key difference between systems, at least when it comes to replacing the rope, is whether or not there are pulleys located in the keel box.
Ours has no pulleys, apart from the turning block at the top of the cabin, and is connected to a separate rope strop anchored on an eyebolt in the keel. There is also an additional strop which appears to be a backup “catch rope” which could have some function if the lift rope breaks. It is a bit hard to describe, and I found that I needed the view though the inspection hatch, which is in the side of the saloon table support pedestal. I used the limited access through that hatch to reconnect the strips and the new rope exactly as the old one had been.
With the tension off the rope, I sewed a mouse rope to the end up on the cabin, and pulled the mouse rope down through the keel case, where I sewed the top end of the new rope to the end of the mouse rope so it could be pulled back up to the top. This meant that I did not have to pull the pre-spliced replacement through the top turning block or through the tube that carries the rope up through the cabin. Just made an estimate of the length from my measurements of the boat, added a good safety margin (much cheaper than finding it too short, and had the end of the new rope professionally spliced in preparation. That is one of the splices I don’t do myself, the local chandler provides an excellent service on this.
It would make a big difference to the procedure if your system has a block and tackle system in the keel case, probably in the section above the waterline, as you would have to Reeve the new line correctly through the tackle, which obviously requires access.
You mentioned that you did not seem to have an inspection hatch. If there is one, it will be above the waterline, on the side of the keel casing, so there may be a panel that you have to remove to see it. If there is no inspection hatch, it must be possible to do from below when the boat is on a high stand and the keel down. I hope that other owners of similar boats will come in and help out.
I found it a daunting task to plan and to try and anticipate all the potential issues, but when we had the boat on the stand, and the centre board removed, it turned out to be mostly straightforward. Now it is testing my memory, I wish I had taken more photos, I am not sure whether the board had to be removed for the rope removal, or just that we needed to do that anyway, and it makes sense to do it at that time.
It might be helpful if you could provide photos or more description of what you can see.
I hope that all makes sense and gives you some ideas to help you make a plan, and get the job done satisfactorily.
rene460
|
|
|
|
Post by timo on May 5, 2020 10:01:12 GMT
Thanks for advice so far Rene, I finally managed to open the centerboard lifting system. Top plate was glued on top of manifold in the hull, needed a little workout with a flat screwdriver and hammer. The rope was really easy to replace. Some worries I have with the centerboard, it looks really corroded. Do you have any opinion on repairing the board, how about concrete? It seems that there are no sacrificing anodes in the board, so it is obvious it will be corroded. I fixed the top plate in place again with new rope, but I did not glue the whole plate, used neoprene seal instead. I put sealing glue only in back end around the roller above the winch. BR Timo     |
|
|
|
Post by MalcolmP on May 5, 2020 10:57:42 GMT
Well done Timo in getting access and replacing the rope.
Do you have any photos of the keel plate from the outside? an anode would seem very sensible if it does not cause any restriction.
Would like to add this to Hints and Tips when you have finished, sure to be of help to others with Sun Rise and other lift keel Jeanneau's of this age.
|
|
|
|
Post by rene460 on May 6, 2020 2:54:22 GMT
Hi Timo, glad you were able to remove the top to get access to the rope. I can’t think why it was ever glued down in the first place. It is always safely above the water line in any circumstances where you would say the boat is still floating. Except for perhaps the mud issue that was recently the subject of another thread. And in any case, as you can now see, the top of the casing is not waterproof anyway, due to that lifting rope exit pulley.
You will have not trouble with that neoprene seal you have used. You might be surprised at how many trailer sailers have a completely open top to the centre board casing, which is also part of the saloon table. The biggest problem is dropping the cutlery down the slot at meal time. No problem (apart from the need for replacement) if it drops right through, but you don’t want it to get stuck half way through, so you can’t get the board up or down, and getting back on the trailer is a big problem.
Regarding the board, it appears that your board is a very different construction from mine, and possibly a steel plate. But still not the full ballast like some of the other designs, as that lifting tackle does not look suitable for a really heavy board/keel.
I think I would drop it out, and as Malcolm says, some pictures would help. If it is galvanised, a further anode may not help much, and some good surface preparation of the damaged areas and cold Gal paint might be adequate to keep it in good shape between lift outs. If it is a composite of fibreglass, perhaps a wooden core, and some steel attachments, which are perhaps anchored under the fibreglass skin, some better understanding of the construction is needed to determine whether the rust is superficial or more fundamental.
As always, understand the construction and you are more than half way there. But maintenance of these parts is important, so please keep us all informed
rene460
|
|
|
|
Post by timo on May 11, 2020 9:23:47 GMT
Hi, Yes this topic can be added to hints&tips for sure. Below a picture from Jeanneau owner's manual. The board is a steel plate, I cannot see it until I dry dock the boat next autumn. I must make some modification to storage stand, there is a longitudinal steel profile underneath the keel. I need to cut that profile on the way of the board and place the stand appr. 1 m above ground to be able to lower the board. I am a bit concerned about corrosion, also there are "centering studs" (8.) according to picture, which can be already disappeared after 34 years. -Timo  |
|
|
|
Post by rene460 on May 11, 2020 11:20:49 GMT
Hi Timo, great that you were able to get that sketch, it is quite informative, and will give you some idea what to prepare for.
It has some important differences from ours, so there are still unknowns, but I can offer some thoughts based on my experiences doing ours. Just trying to help think it through based on the similarities with our boat, in the hope that it will help you. But I don’t know your boat, so be prepared for differences.
Weight - you have a two to one advantage due to the pulley on the arm, and the lifting arm is closer to the centre of the board, so I would expect that yours might be more than twice the weight of ours. Ours is about 40 kg, so you would be well to prepare for something like 100 kg or more, I don’t expect it is something you could lift by hand, more likely a hydraulic jack to take the weight, and keep the lifting rope ready to Instantly take the Weight if necessary, and to slowly lower the keel under safe control. You will need someone who understands what you are doing in the cabin until the keel is safely on the ground. (I worked the winch and lift rope, while the ship right and his very strong assistant did the work below.). Think carefully about how you will Safely lower the board once the pin is out.
Pivot pin - ours is a plain cylindrical bar, 25 mm in diameter a little shorter than the thickness of the whole outer keel case in the area of the pin. Yours may be larger diameter, but it might be worth preparing for a very similar installation. The keel had a metal bush lining the through hole in the fixed part of the keel. The pin had a threaded hole for M8 bolt in each end. The bolt head held a large washer, larger than the pin diameter, which retained it in place. The bolt heads and washer were just below the outer surface of the keel, and bogged in a sealant like sikaflex, which is what we used when we put it all back. You need two ring spanners, the same size, so you can hold one end while you turn the other end With the second spanner. An adjustable wrench will likely damage the bolt heads, so have two sets of spanners ready. It is anyone’s guess which end unscrews. We made sure we put a generous coating of grease (same one as recommended for the feathering propellor), on the outside of the pin and one of those pastes used to prevent corrosion between dissimilar metals an anti seize compound on the threads when we put the bolts back in. We bogged the bolt heads back in as fair as we could make it with sikaflex, and after it had set overnight, put some anti foul paint over it all, to match the rest of the keel surface.
Centring studs - ours were plastic pads about 50 mm diameter, about 10 mm thick, attached by screws each side of the keel. They did not seem to have any significant wear and the originals are still there.
Boat Cradle - our yard has a variety of stands to suit different boats, a solid frame at ground level, a 12 inch square timber longitudinal beam to take the keel of normal deep keel boats. Then there are vertical arms which are designed to be easily adjusted to different size boats to stabilise it side ways, props under bow and keel with suitable load spreading pads, and a good moveable star to allow access to the boat. Pretty common style in other boatyards. Talk to the boatyard about what they suggest before cutting a purpose built cradle. When we plan to take the keel out, effectively every year, now we know how to do it, we ask for the boat to be supported high so we have about 1.5 metres clear under the boat. They do this by boat yard props under each end of our stub keel, carefully keeping the area under the keel box opening clear. This gives us room to work under the boat. We remove the bog, unscrew the bolt on at least one end of the pin, While friction holds the pin from rotating with the weight of the keel still on it. But our bolts were tight and the pin rotated anyway, hence being prepared with two spanners. and between me in the boat taking the weight with the lifting rope and winch, and a jack under the end of the keel opposite the pin, and some delicate fiddling, we can get the weight off the pin without lifting the keel to cause extra friction on the bolt, and the bolt pushes out from one side with a half inch bar we had in the toolbox.
It is all harder to describe that to actually do, and most of our worries before we started turned out to be non-existent. The first time, we started very late in the day, as the shipwright felt he could not sleep if he did not make some attempt to find out how it all fitted together before he went home. We were all surprised to have the board out clear and on the ground in about half an hour.
You can’t really over prepare, but I am sure you will find that the system has been designed with considerable thought about how it would be installed and maintained. I am confident yours will be the same despite the inevitable differences. So don’t lose too much sleep before hand.
The biggest variable is perhaps the actual Weight of the board. You mentioned that yours is a steel plate, you could estimate the weight from some dimensions and the density of steel, even if you can only take the necessary measurements after lift out. Ours is a composite of fibreglass, possibly built on a wood core, (I wish I knew the answer to that one) but actually has a metal ballast buried deep inside so that it will go down. Without that, I believe it would float and need a rope to pull it down. But still a relatively light weight. All our ballast is in the iron keel around the keel case. Like the shaded area in your sketch. But some things I have read imply that some models have a heavy design that forms part of the ballast. Better to prepare for heavy, as lighter is then easy to deal with.
I hope that is some help as you plan the work.
rene460
|
|
|
|
Post by MalcolmP on May 12, 2020 17:09:25 GMT
|
|
|
|
Post by MalcolmP on May 12, 2020 20:53:06 GMT
There is also an extremely helpful article over on our Facebook Group about removing a Sun Shine Dropkeel. It seems that the Sun Rise, Sun Shine and Fantasia at least all had very similar mechanism's. I have permission from the FB group poster to use his photos, so will add those to the Hints and Tips article tomorrow, but one of the reply posts does show detail of what I believe is the Sun Rise keel that very helpfully shows the weight as 110kg. This of course may not be exact, but should help in planning how to safely support and remove such a lump of steel... I will update this thread when the H&T's article is next refreshed. 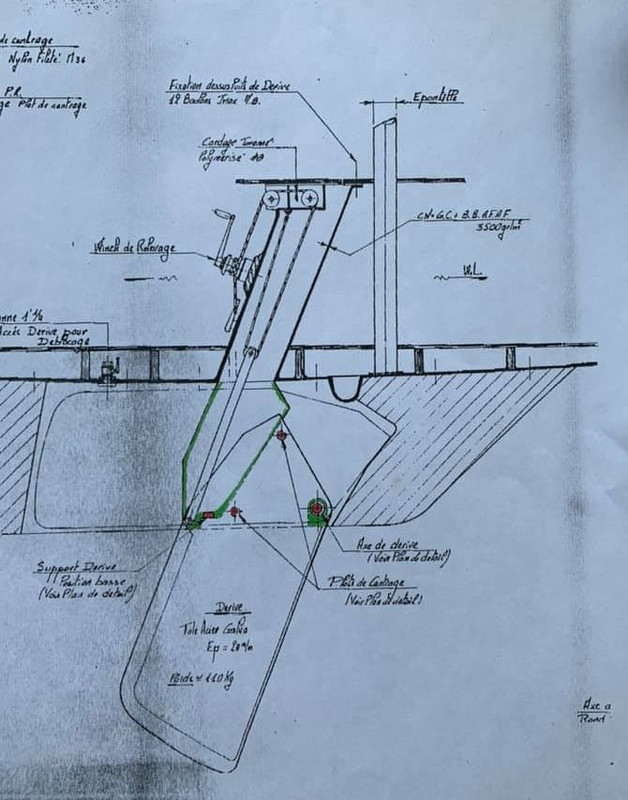 |
|
|
|
Post by MalcolmP on May 13, 2020 14:22:25 GMT
I have now added more information from a very helpful and relevant post on our Facebook group. www.jeanneau-owners.com/hintsandtips/sunrisedropkeel.htmlIt appears that very similar systems were used in at least the lift/drop keel versions of the Fantasia, Arcadia, Attalia, Sun Dream and Sun Shine. Larger boats like the Sun Fizz, Trinidad and most of the Espace range had a different system using a hydraulic pump. |
|
|
|
Post by wysiwyguk on Jan 23, 2023 14:13:34 GMT
Hi, I have a sundream 28 with the same drop keel. My lift mechanism came apart from the lift keel over christmas, I am getting replacement clevis pins made up in 316 for the lifting bars, when I get the boat lifted I may need to get the pivot bolt replaced if it looks badly corroded since i had it last checked when i got the boat from clarke and carter in 2017, but am trying to find out what it is and where i can get one from. Do you have details of what the pin is exactly. thank you   before i painted last year  after a paint  |
|


