|
|
Post by lynnardm on Mar 6, 2019 3:32:56 GMT
I created a new thread just for the subject of radar installations on 895's as I anticipate this may be a popular topic.
First, for fun, here's a picture of the conditions you don't want to venture out in. This is in Gig Harbor, Wa. Fortunately we were able to wait it out and the fog cleared before we departed. 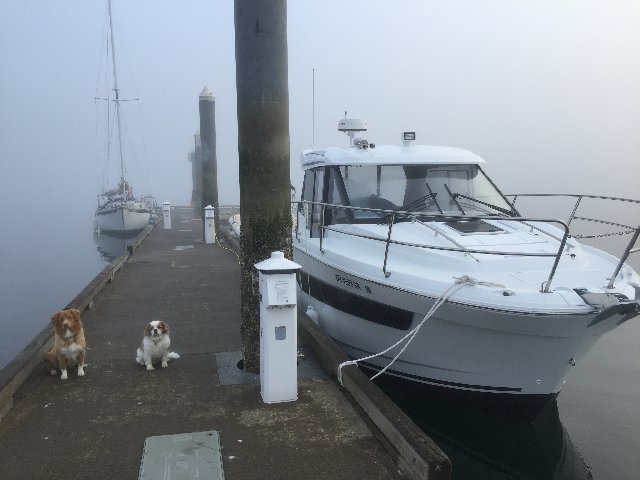 www.23hq.com/lynnardm/photo/52313032/original
Here is a picture of the radar just after installation. The boat (a 2019 model year) is setting level. The boat also floats in this "level" condition when in the water. Of course unusual loading, such as triple motors, can affect the boat attitude :') The radar is mounted on the flat level area where the nav light was previously mounted (the flat area can't be seen in this pic). You can see the 4 degree down angle of the radar. On-plane the 895 assumes a bow up position of about 4 degrees. So when on-plane the radar is aimed "level". 4 degrees is a common attitude for power boats on-plane. In this picture you can also see where the overhead cockpit light has been removed for access to the underside of the radar mount.
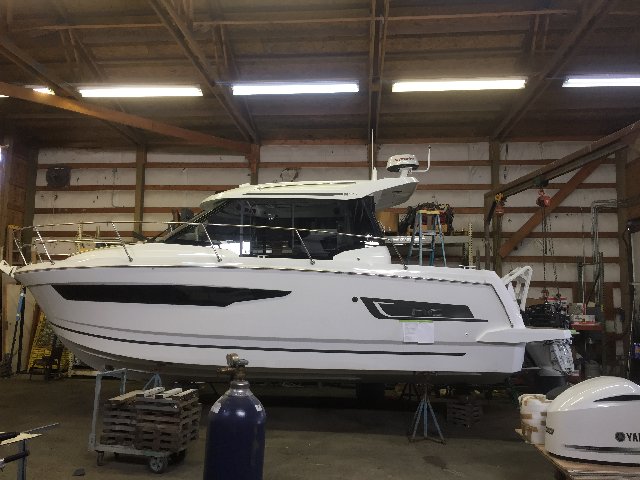
www.23hq.com/lynnardm/photo/52313067/original
This photo shows a closeup of the radar and radar mount. In this picture you can see details including the flat area where the radar is mounted. I haven't previously seen an 895 radar mounted at this location. I chose this location as I determined the roof should be fairly rigid here, it kept the radar at the aft end of the roof thereby saving space for throwing an inflatable dinghy on the roof, and I think the radar and nav light install looks great here.
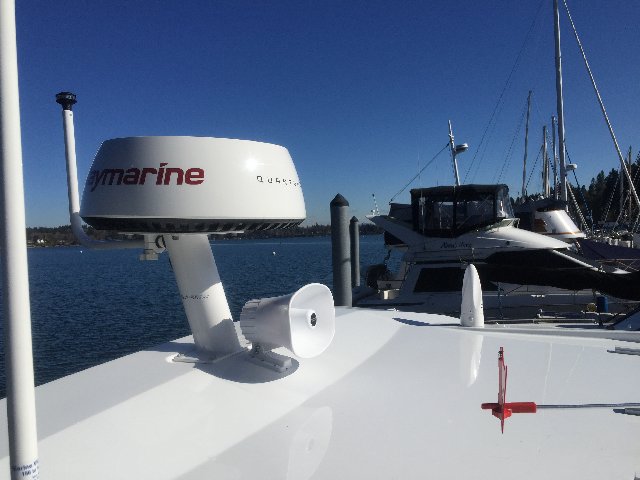
www.23hq.com/lynnardm/photo/52313038/original
The flat area where the radar is mounted is approx 4.5" x 10". The radar mount base is designed with the base 4.5" x 8" with a bolt hole pattern 3.5" x 6.5". The radar mount height is 12" and as I mentioned earlier it has a 4 degree down-tilt. With a 12" mount height at this location and the Raymarine radar it provides 7 degrees of downward visibility for the radar beam when on-plane. The front upper edge of the salon roof is what limits the radar "visibility". The roof light obviously protrudes above this area but overall this small light should not be not significant for the radar beam bounce-back. A 10" height would provide 6 degrees of downward visibility which is also good. Raymarine recommends a minimum of 10 degrees which I believe is pretty standard. Both these heights will provide good "visibility" for low objects close to the boat. And of course when traveling off-plane the radar forward visibility distance for low objects is better than when on-plane, respectively at 11 degrees and 10 degrees. The radar mount was built by Sea-Scan to my specs. This is what they do. They did a beautiful job at a very reasonable price ($299). Their design includes the hardware to relocate the nav light on the radar light bar. Their package included all hardware required for the install. Their contact person is Steve and his number is 615-208-5002. He should have this design on file under Jeanneau NC 895 and my name (Lynn Miller), and he told me he gave it a model number of AL1200-4. They are also on the web. I cant say enough about what I good experience it was working with Steve. And once I finalized the requirements he had the mount built and shipped in 3 days! Back to the installation... There is one area of potential difficulty. The underside of the flat mount area has a plywood stiffener imbedded in the fiberglass to add strength to that area for the light mount. But it was significantly smaller than the 4.5" x 10" top surface. It would have been nice if Jeanneau made it the full size of the flat area. I/we got lucky on the installation as the bolts just cleared the plywood stiffener. If the imbedded stiffener varies in size or location on other 895's it could mean that a buildup might be required so the nuts on the 4 mount boats properly nest to a flat surface. One more comment. The installers, after doing this install, did like this approach and felt that this area of the roof was a preferred location to some other options.
Capt'n Lynn
|
|
|
|
Post by gia2019 on Mar 7, 2019 18:08:56 GMT
Very valuable and detailed explanations and pictures, I appreciate it. I am glad I have a chance to communicate with you. Sometimes, my questions may sound naïve, but hope, you will take it with understanding and patience. I am new in boat owner's society. I have this questions: 1)Right next to the radar/horn, there is this white mounted object. Is this Flir Night vision camera or antenna? 2) do you use any fender grips to hold lines on the rails? 3) do you use 3/4 inch lines and what quality? 4) any special fenders you use? my boat's new confirmed eta is March-20-  |
|
|
|
Post by westboating on Mar 8, 2019 6:13:32 GMT
Capt Lynn,
Few questions, what was the out the door $$ on the set up? Which plotter do you have, and how is the radar integrating with it? Have you taken here out and validated the ability to detect objects in the potential blind zone behind the roof top spot light?
Thank You, and it looks great
West
|
|
|
|
Post by lynnardm on Mar 8, 2019 7:19:00 GMT
George,
Very exciting that your boat is coming soon! The white pointy thing on the far side of the picture (port side) about 8 or 10 inches tall ( I don't remember for sure the size) is an antenna. Its for the FM radio and I also have a splitter and line ready when I get around to installing a TV. It improves the stock radio reception quite a bit but no AM. Its installed basically on the opposite side of the roof at the same fwd/aft and inboard/outboard location as the VHF antenna. 3/4" dia line is too heavy. You should be using 1/2 to 5/8". You want the line to have a little bit of stretch/flex to help absorb shock when the boat moves around. And just make sure its a good quality line made for mooring. There is a lot to learn on secreting a boat. I separate lines and more of them along with snubbers and bumpers attached to my slip for "permanent" moorage. When I'm out and about I use different lines and bumpers that I keep on the boat and my methods vary depending on the situation. Nothing wrong with good fender grips but I don't use them. Feel free to start a separate thread on this subject as its important. I might weigh in with a bit more detail and pictures.
West,
What in particular are you asking about for pricing? I put a package together consisting of radar, hailer, horn, antennas, chartplotter, thru hull transducers and radio. I can dig that out if you like. The chartplotter is a 12" Raymarine Axiom. It integrates nicely with the radar. The radar doppler does work as advertised as it gives me red or green warning colors on moving objects that are on a potential collision course. But that same function for non-moving objects is not giving me the color coding. I need to call raymarine it may be a simple setting I have wrong. I have not been able to detect any blind spot due to the light. I believe that as the boat is always moving which results in the radar moving up/down/port/starboard any small blind spot is mitigated. I actually tried to find a blind spot while approaching some large buoys. Even in calm water its difficult to keep a boat on an exact straight course :')
Captn Lynn
|
|
|
|
Post by CruisingCascadia on Mar 8, 2019 8:11:50 GMT
Great post Capt Lynn! I really like the idea of having a hailing speaker. Our setup is a bit different. Our mast is forward of the hump and we had an access hole put in just above the cockpit door. We have a 10" mast but we also have a spreader kit installed that adds at least 2". I will be changing the gps pole on the spreader kit to a stainless steel one, just to get a more uniform look. We have only been out on the boat 4 times so we haven't had time to experiment with targets and the radar yet. Here is our setup breakdown: Seaview PMA-107-M1 10” radar mast Seaview SP1-MOD SPREADER KIT -Seaview ADAR modular top plate for Garmin -Seaview LTBR light bar Seaview PM-W4-7? Wedge Attwood LED 7800 Top Light     |
|
|
|
Post by lynnardm on Mar 8, 2019 15:36:07 GMT
Hans
That’s a great looking setup. Nice boat too :,) Given the location and height I’d expect similar downward “visibility” over the fwd salon as my setup. Did Skip add foam between the salon ceiling and roof? This is something he’s said they have been doing but didn’t on mine. You should have a fun time practicing with it. Let us know how that goes. Do you have 2 vhf antennas? Is that a white visor I see over the cockpit?
Yes I do like having the hailer horn. Besides the normal stuff like yelling at other boaters :.) and using it as a fog horn I can for fun even communicate with people on the bow (it has a listening function too).
Capt’n Lynn
|
|
|
|
Post by franssacco on Mar 8, 2019 17:42:50 GMT
Hi...I put a package together consisting of radar, hailer, horn, antennas, chartplotter, thru hull transducers and radio. I can dig that out if you like. The chartplotter is a 12" Raymarine Axiom. It integrates nicely with the radar. The radar doppler does work as advertised as it gives me red or green warning colors on moving objects that are on a potential collision course. But that same function for non-moving objects is not giving me the color coding
|
|
|
|
Post by CruisingCascadia on Mar 9, 2019 7:30:34 GMT
West That’s a great looking setup. Nice boat too :,) Given the location and height I’d expect similar downward “visibility” over the fwd salon as my setup. Did Skip add foam between the salon ceiling and roof? This is something he’s said they have been doing but didn’t on mine. You should have a fun time practicing with it. Let us know how that goes. Do you have 2 vhf antennas? Is that a white visor I see over the cockpit? Yes I do like having the hailer horn. Besides the normal stuff like yelling at other boaters :.) and using it as a fog horn I can for fun even communicate with people on the bow (it has a listening function too). Capt’n Lynn Thanks Lynn! We are hoping to get out"practicing" on Sunday 😁 One of those antenna is an ais transceiver antenna. Unfortunately the ais only works for about 10 minutes before shutting down. Hopefully that will be fixed soon. Skip didn't add any foam to our install. He said that the roof was reinforced in that area for a mast but he recommended not putting anything too heavy up there for fear of cracking the gelcoat. Charlie even said that the roof was safe to walk on. I'm 220lbs so I don't know if I really want to test that theory out. We got the cockpit enclosure option. The enclosure is the same light gray as the seats. I'm sure it will be a bit of a nightmare to keep clean. So I guess nosing up to some buoys would be the best way to test the downward visibility? Have you tried this yet? Hans |
|
|
|
Post by lynnardm on Mar 9, 2019 15:33:04 GMT
Hans,
I need to keep it straight who I'm responding to :')
Ah, an AIS antenna. Of course. That reminds me... My Raymarine Ray70 radio is supposed to have an AIS receiver and display AIS objects on the chartplotter. It uses the same antenna as the VHF. But I don't get any AIS objects on the chartplotter. Its another thing I need to sort out.
I weigh 175 and climb up on the roof every now and then to give it a good cleaning. And I've seen one of the Sundance guys up there cleaning the boat and I think he is heavier. Perhaps that was Charlie. It seems plenty strong. I wouldn't think an additional 50 pounds would matter but then again I wouldn't want to be the load test guy either. If any Jeanneau people are listening in please provide input on load rating.
Yes I did test the visibility. It was a perfectly calm afternoon and I went into a small harbor up in the San Juans. There were several large round buoys with no boats so it was a perfect test situation. Moving fwd a bit above idle speed, as I approached each buoy would disappear from the screen. Perhaps 30-40 feet from the front of the boat - although its hard to judge the distance. Let us know how your testing goes.
Captn Lynn |
|
|
|
Post by gia2019 on Mar 10, 2019 21:16:08 GMT
|
|
|
|
Post by lynnardm on Mar 11, 2019 17:06:41 GMT
|
|
|
|
Post by gia2019 on Mar 12, 2019 18:39:14 GMT
Good day Lynn. Tomorrow I am going to see my boat at dealer's facility, to check on my unit and discuss some points. I also have many questions for him . I plan to have very detailed discussion with Electronics specialists at dealership, about Radar vs AIS. Will share with you all information I will be able to get. |
|
Sean M
Junior Member

Posts: 11
Jeanneau Model: Merry Fisher 855
Yacht Name: Marking Time
Home Port: Lake Stevens, WA
Country: United States
|
Post by Sean M on Apr 26, 2020 2:43:30 GMT
Question for any that have the radar. Do you know how the cable was routed? My Lowrance 4G dome seems to have crapped out, seems kind of sad since the boat has 60 hours on it. It's a 2016 855. I'm thinking I may just upgrade the electronics away from Lowrance but I don't know how the cable is routed. I haven't removed the cockpit light to take a look, is there a tunnel down the starboard side of the sliding glass door as I believe I've seen part of the cable in the lazarette running up under the cabinet, up into the helm. My wiring being the helm is a complete mess. I think the guys that installed the joystick (from the original owner) just didn't care and put their wires everywhere. I've done some looking around and found that my sonar line was just hanging loose, attached to the chart plotter but the other end goes to nothing.
|
|
|
|
Post by captaintheo on Jul 12, 2020 2:38:59 GMT
I am buying the 2020 NC895 offshore and it comes with garmin plotter and transducer
I thing all I need is the radar and mount, anything else?
Boat comes with a search light on the front of the roof and a roof rack and I am planning installing a inflatable dingy for 4 to 6 people plus the radar and arm and hardware
Any Recommendations from our nc895 veterans?
|
|
|
|
Post by alexrom on Jan 16, 2023 22:26:12 GMT
Looks like Sea-scan is out of business. This number is now sells music instruments. Sea-scan site has email and another cell - both unresponsive. If someone has their actual contacts - please share
|
|
|
|
Post by stuwright on Mar 10, 2023 7:23:36 GMT
I am buying the 2020 NC895 offshore and it comes with garmin plotter and transducer I thing all I need is the radar and mount, anything else? Boat comes with a search light on the front of the roof and a roof rack and I am planning installing a inflatable dingy for 4 to 6 people plus the radar and arm and hardware Any Recommendations from our nc895 veterans? I’m interested to see how your project goes because I have a Garmin radio with a transceiver. I have now fitted the Garmin rear facing camera so won’t have the option of fitted to the same place as Catn Lynn. I’m hoping the mount company hasn’t gone bust because I still see them for sale in the UK. |
|
|
|
Post by pnamenyi on Mar 13, 2023 23:00:47 GMT
I think I went a bit further than I saw on any MF 895 Offshore and installed a Scanstrut PTM-R1-1 radar mast.   |
|
|
|
Post by stuwright on Mar 19, 2023 20:19:24 GMT
I think I went a bit further than I saw on any MF 895 Offshore and installed a Scanstrut PTM-R1-1 radar mast. That is a really nice set up you have there. It looks like that would work for me for a radar dome and a Flir camera. Did you speak to anyone regarding if it was ok stress wise on the roof and if yes is there a specific measurement to site it on? I see some owners fit precision location antennas and wonder if you have one or know if they are needed? Next year I intend to cross the English Channel and want to be prepared. |
|
|
|
Post by stuwright on Mar 22, 2023 20:46:53 GMT
Today I had the engineer down to my boat regarding fitting radars and cameras and had a good chat about what I would be using them for. One of the difficult things is fitting all the equipment on these roofs that are not particularly strong. The area behind the sunroofs doesn't feel very solid and you can tell there is a gap between the layers. The local Jeanneau dealer said it needs to be reinforced to make sure there is no future cracking. Has anyone else gone through this process and if yes what was your solution?
The issue with reinforcing an area is they said there are 2 choices, both involving cutting out a section underneath to get access. the first way would be to put in an inspection cover either inside, or in the outside overhand before the led light. I have looked at the covers available and I don't really like them. The second option is t cut out the section needed and have a grp specialist repair it so it cannot be seen. The second option is better for me but more costly.
After looking at my intended usage I have decide not to go for the radar and instead just fit the Flir M232 camera and upgrade my AIS to a transceiver set up. This will reduce cost and load on the roof a lot. I do intend to do a trip to France next year but will pick decent weather and will go with another boat who has AIS and radar fitted.
|
|
|
|
Post by lynnardm on Mar 22, 2023 23:25:11 GMT
Stu
All that hardware on the top of that area of the roof is a concern. I go up there when cleaning the roof but that’s not the same loads that might be generated over time with a significant mast. The lead technician at Sundance yachts used a foam fill method when mounting a radar mount in that area. We didn’t use it on my boat as my radar mount is where the mast light was attached. That area is fairly stiff and we both felt additional roof strength was not needed there. Plus it’s just radar, not a large mast or a bunch of other hardware. I haven’t seen them do the foam fill method. But the idea is to use an expanding structural type foam similar to what’s used to fill small holes or cracks in houses. And fill a large area between the lower fiberglass ceiling fiberglass and the upper roof fiberglass. If done correctly I can imagine that it would act as a sandwich panel and provide lots of rigidity and strength
Capt’n Lynn
|
|
|
|
Post by stuwright on Mar 23, 2023 10:37:30 GMT
Stu All that hardware on the top of that area of the roof is a concern. I go up there when cleaning the roof but that’s not the same loads that might be generated over time with a significant mast. The lead technician at Sundance yachts used a foam fill method when mounting a radar mount in that area. We didn’t use it on my boat as my radar mount is where the mast light was attached. That area is fairly stiff and we both felt additional roof strength was not needed there. Plus it’s just radar, not a large mast or a bunch of other hardware. I haven’t seen them do the foam fill method. But the idea is to use an expanding structural type foam similar to what’s used to fill small holes or cracks in houses. And fill a large area between the lower fiberglass ceiling fiberglass and the upper roof fiberglass. If done correctly I can imagine that it would act as a sandwich panel and provide lots of rigidity and strength Capt’n Lynn Capt'n Lynn, I totally agree and was surprised how flexible most boat roofs are, even though I would say I had less in my old 725 roof. Apparently the strengthening has been done on an 795 & 855, so I will post back when I get the quote and get to see what they are proposing. Foam may work well but I wonder if it could expand and push the roof up slightly? I pumped fire retardant foam into a void one which bowed redundant access plate made of plastic. It would be good to hear what others did that fitted bigger mounts for multiple items. Thanks Stu |
|
|
|
Post by lynnardm on Mar 23, 2023 23:26:36 GMT
Stu
Here’s a possible approach first draft. Before you go further… I think the risk of anything going wrong is minimal. But… It’s kinda scary to think about cutting as described below. Would take confidence and nerves of steel :,)
Determine location for the radar base mount. Place the radar base on the roof and mark and drill the mounting holes thru the roof fiberglass. For the radar base, it should obviously be large, perhaps at least 8 x 12” to spread the load. A bit larger even better.
Mark the center of the mount area and drill a hole through both the roof and the ceiling. This will mark the center of the ceiling access panel. Determine what you are going to use for the ceiling access panel. Size the cutout you are going to put in the ceiling accordingly. You could use one of those standard almost flush mount white access panels or a stainless steel mirror or a composite cover panel that matches the black in the interior. More on the mirror below. Keep in mind the ceiling access hole needs to be smaller than the bolt pattern of the radar base mount holes.
At radar base mount holes (assuming there are 4) install 4 custom fit wood spacer blocks to slip fit between the roof panel and the ceiling panel. The blocks should be centered at each hole. Glue blocks in place using a filler/adhesive material such as liquid nails.
Drill through the blocks and ceiling at the previously drilled base mount holes. Install the radar base mount with 4 stainless bolts. Countersink of the ceiling fiberglass before installing bolts if yuh want a flush install of bolts. in this case the bolt head should be a flat head. Install with bolt heads on the interior.
At this point you can determine if you want to add expanding foam between the panels for additional rigidity. I’m thinking it might not be needed as you’ve now created a sandwich panel with the upper roof, the blocks, and the ceiling. On the mirror if used for the access hole cover … Stainless steel mirrors are made for applications such as boats. They are amazing as they look like glass mirrors. Might be cool to have one on a ceiling.
Install the ceiling access panel. If you’ve chosen a panel type that fits into ceiling opening then 4 bolt heads will show. I’d say it’s not something that will look out of place as stainless fasteners are used lots of places. If you’ve chosen a panel that’s larger than the mount bolts then just the panel will be visible.
In considering this afterwards it all seems like a solid approach. But I don’t know if I’d do it on my boat. I might not have the nerve. But as a designer/engineer I found it fun to think through :.)
Capt’n Lynn
|
|
|
|
Post by rene460 on Mar 24, 2023 11:44:03 GMT
H Capt’n Lynn,
Your method is very similar to the method for mounting fittings on a foam cored construction, except that the foam is not there. So properly done should be quite sound.
My previous boat was foam cored, and as I bought it as hull and deck, I had to install all the fittings. The builder explained the method which I followed carefully and saw no evidence of any collapsing even around heavily loaded fittings over the 20 years I had the boat.
Basically the method was to create a void around each bolt hole, fill it with epoxy resin and when it was cured, drill and tap the resin. Tapping was probably unnecessary as I used a large washer and nut under to fix the bolt. It was more to provide a tortuous path for any water entry, but preferably filled with the sealant all over the bolt before it was screwed in, and not for strength. The bolt was installed with plenty of Sikaflex to make it waterproof. The resin plug ensured that the outer glass layers did not compress the foam when the bolt was tightened, basically the same purpose as your wooden blocks.
In addition I built a pad on the outside for larger fittings such as a big winch for the keel, by covering the fitting with stretch film and pressing it into some glass bog in location, and cleaned away around the outside of the fitting. This ensured that the fitting sat on a flat surface even though the cabin top was gently curved. It was a little tedious, especially for every bolt on the long jib tracks, but a very satisfactory result.
The method could easily be adapted so you could avoid the necessity for the inspection opening on the inside you have proposed. But such removable openings are always useful for the access they provide to otherwise inaccessible cavities, it depends on your ideas for appearance on the inside. As you say, there are visible bolts and nuts there anyway. So song as they are stainless steel (type 316) so they do not rust, they will look like they belong.
So long as the load is spread over a large area, it will not collapse the roof. However you could inject foam if you wanted. The danger you mentioned is if you overfill the compartment so there is nowhere for the foam to expand. It can create quite enough pressure to swell your panels if it has nowhere to go. You want a quantity that will fill in the area around your fitting, but be fully expanded before it fills the whole cavity. Then a flattening pad under the fitting can spread the load over the whole area of the base so the fitting is solid and does not rock.
Will be interested to see how the project goes and which method the owner selects.
rene460
|
|
|
|
Post by stuwright on Apr 2, 2023 7:35:44 GMT
Some really good ideas and very helpful to have choices. Let’s see what the wife says about the boots because although I’m ok with it I’m not convinced she will be. :-)
When discussing the Flir camera one engineer suggested cutting an access in the outside overhand to push in marine ply and glue in place. Then if I wanted a hidden repair get a gelcoat company to do it. I guess that could be possible without bolts due to the difference in loading compared to a radar.
Thanks
Stu
|
|
simons
New Member
Posts: 5
Jeanneau Model: Merry Fisher 895
|
Post by simons on Nov 25, 2023 7:38:04 GMT
pnamenyi Marina Kornati - Biograd... on left side is my MF895 I think I went a bit further than I saw on any MF 895 Offshore and installed a Scanstrut PTM-R1-1 radar mast.
|
|


