|
|
Post by John on Nov 11, 2022 14:07:26 GMT
Looking at servicing the top swivel on a Facnor 180 furler ( 2007 model ) , anyone do this and has a explanation on how to take apart or photos .
|
|
|
|
Post by Caxton on Nov 11, 2022 16:14:00 GMT
I had problems with my Fancor LS 180 furler on my SO 39i. Over the years there was more and more problems furling and especially unfurling the jib. I went up the mast and found the forestay was "birdcaging". My rigger said I should replace the stay and recommend I upgrade my furler to a Harken MKIV Unit 2 Ocean Furler. The new Harken furler is great and I would recommend it if you are going to replace your Fancor.
The rigger said the "birdcaging" was likely caused by higher stresses induced by furling the jib using my electric winch. He said he sees it frequently. Best, Caxton Attachment Deleted
|
|
|
|
Post by bereboot on Nov 11, 2022 18:04:01 GMT
This " birdcaging" seems to be a problem with all the furling systems due to the stresses involved according to my rigger. Remedy: regurally check the head of the forestay
|
|
|
|
Post by MalcolmP on Nov 11, 2022 19:21:14 GMT
|
|
|
|
Post by rene460 on Nov 12, 2022 0:02:48 GMT
Just a further comment on the “bird caging”, I would suggest checking that the jib is wound so the furler turns the correct direction for furling. The torque due to friction on the stay is highest when furling, so that the jib should be wound on to the furler so that when furling, the friction tends to tighten the lay of the forestay strands. It’s not cleat from the picture which way the jib is furled. Just double check the instructions for setting up the furler. There is much less friction when easing the sail out to unfurl. Also most guides indicate that the halliard should be at an angle to the forestay, while in Caxtons picture, it looks to be near parallel, so can wind around instead of unfurling the sail if it is a bit loose.
Obviously a different issue from John’s question about servicing the swivel, which Malcolm has answered, but may be worth checking for others worried about the birdcaging possibility.
rene460
|
|
|
|
Post by eoin2020 on Nov 12, 2022 10:07:11 GMT
Looking at servicing the top swivel on a Facnor 180 furler ( 2007 model ) , anyone do this and has a explanation on how to take apart or photos . If you decide to stick with with your Facnor furling system, Malcolm's link above with the PDF download advice is a good idea. But speaking here from experience with a 2004 model. I had similar extreme stiffness from the jeanneau factory fitted Facnor swivel and furler. And whilst I did periodically service both and was able to free them up after each servicing. Murphy's Law prevailed and the darn thing actually seized when underway and I couldn't furl the headsail when I needed to tuck in a reef. Wind was steadily climbing past 24kn+ full headsail up so only option I had was to lower it on the foredeck and grapple with it as it billowed in the wind. After that I lost confidence with that system. I know you probably won't want to hear this either but you may have to spend the money and replace it! I had done research too and from my reading I'd come to the conclusion that unless the purchaser ordered a higher spec. That as a production builder Jeanneau were fitting the lower spec Facnor furling system. I also had to cough up and replace mine and haven't looked back. |
|
|
|
Post by John on Nov 12, 2022 14:03:26 GMT
Thanks for the replies so far , we have dropped the rig and I have seen the explanation for servicing the furler which I plan to do . We fitted a guide to feed the halyard through previously and replaced the cap at the top of the forestay foil .
Would like to service the swivel as well , Someone may have taken one apart .
|
|
|
|
Post by MalcolmP on Nov 12, 2022 14:13:12 GMT
|
|
|
|
Post by John on Nov 12, 2022 14:54:25 GMT
|
|
|
|
Post by panoramix on Nov 12, 2022 16:45:35 GMT
The top unit is non-serviceable. But if you take a close look there are two holes in it closed with a small steel ball. These holes are used to fill it with a special green grease (that green stuff that’s pushed out while I inject new grease) I was unable to remove the steel balls that close these openings, so I drilled new holes next to it. The bearings in the top unit are non-sealed version so the grease is pushed through the ball races. 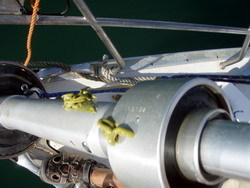 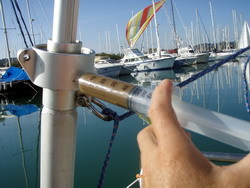 |
|
|
|
Post by ohana on Nov 12, 2022 22:01:05 GMT
Hi, I have also taken apart my top swivel and it it essentially identical in its design and working to the lower drum, so the drum guide will be relevant for you. there are other good threads on this in this forum which would be worth looking up. |
|
|
|
Post by buddyseattle on Nov 14, 2022 0:53:23 GMT
I just finished servicing the top and bottom units on my LS180 from my 2008 39I so I will share my learnings. If yours is similar to the one above in photos with a service port, then that is great. Mine must be slightly newer, as shown in the photos. The lower unit instructions from Ohana and others were a great start! However, in my case, removing the seal was far more difficult. This took a lot of heavy leverage to remove building a frame and lever about 5' long. After getting the unit apart, I found the unit was actually pretty clean inside and the bearings in good condition. Most of the friction from the lower unit is inherent in the seal, and it didn't increase under load. In hindsight if it didn't bind or grind under load, I would move on to the upper unit. The upper unit because notably harder to turn under load. The upper unit disassembly was similar, but the main seal removal became impossible as it hit a small grommet for the halyard to pass through when pulling the seal up and out. Without a lot of force or destroying the seal or grommet, I looked for other options. After reading about the boiling water suggestion, I found that if I took a tiny needle syringe with some denatured alcohol, I could inject a small amount between the frame and the seal. After doing this 20 times or so, I could see the goo draining out and the bearing moving about freely. I did this multiple times over a day till the liquids ran clean. I then put in a small about of lubricant and replaced the seal packed with grease to help keep water out. This assumes you have good steel bearings and Stainless clips. This was the easiest and most effective improvement for me. The upper unit was the biggest issue in my system. I would not have spent the time on the lower unit in my case as I didn't have the steel clips that rusted either. The time spent trying to remove the seal un the upper unit was not productive. I think the fact that water is trapped in a "cup" on top of the upper seal and it can only go down into the assembly is the problem. It seems like there should be a couple of tiny weep holes just above the seal. Cleaning the upper unit has improved the operation, especially under load from the halyard. If you are having issues with the halyard wrapping at the top, be sure you have the right angle (15 degrees), especially if you don't have a deflector. I think that the best thing to do to keep it working smoothly is to do the boiling water solution and make sure it runs through the unit. I am going to start doing that whenever I pull down the sail. I hope that helps you out.   |
|
|
|
Post by John on Nov 15, 2022 14:04:49 GMT
Hi buddyseattle ,
Thanks for the reply , all good information I plan to service both units over the winter .
|
|