eublem
Junior Member

Posts: 10
|
Post by eublem on Apr 28, 2019 20:41:36 GMT
Hello. I need to fix a hole in my boat. I am wondering what technique would be the best and how to build up the hole while keeping the strength intact. I am bugging my head on how to best solve this.. Any ideas? I have uploaded a picture so you can see what I mean and where the hole is located. Thank you very much!  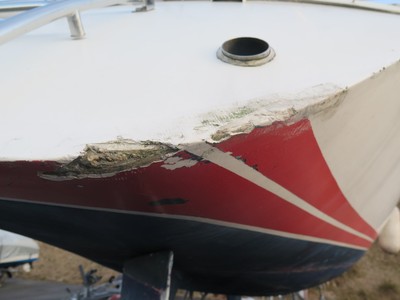 |
|
|
|
Post by rene460 on Apr 29, 2019 1:15:28 GMT
Hi Eublem, Ouch! You are quite right, that needs fixing.
The good news is that the boat is fibreglass, and fibreglass is eminently fixable.
That location is difficult because of the corner, and because it will be very visible. You need to check the access from the inside, as for a normal repair, it is often preferred to feather back the edges on the inside and build up with layers of glass mat and resin. The outside is moulded by a smooth sheet taped to the outside but perhaps 0.5 to 1 mm clear to allow for shrinkage as the resin sets, then sanded back. It is beyond my expertise to explain all the detail, and I would get a local fibreglass worker to do it. They save so much time by their expertise and skill that, certainly the time I had a similar injury on my previous boat, I did not think the cost was excessive.
There are some very good books on fibreglass repairs of boats available in Chandlers and Boat Books shops if you want to know more detail. But at the end of the day, it is readily fixable and a good repair will be sound, and barely visible. Please post some pictures as you go. If you reverse into those low floating marina berths, injuries like that are bound to happen one day.
rene460
|
|
eublem
Junior Member
Posts: 10
|
Post by eublem on Apr 29, 2019 17:34:38 GMT
Hi rene460. I'll do my best following your advice. I think I'm overthinking the difficulty. I have been searching youtube up and down for a similar problem, but only find inner corners. I have sent an e-mail to west marine asking for advice, but I'm still waiting for a reply.
I can see that there are two fiberglass plates meeting each other, does that matter at all or will it bond and seal like any other place? .. concerned about the strength.
|
|
|
|
Post by sitara on Apr 29, 2019 22:17:31 GMT
Hi eublem, does the hole/damage penetrate the hull or is it severe surface damage? If it is surface damage I would suggest grinding away all the damaged material and then feathering the low area back into to good material with a gradient of about 10:1. This will provide a big surface area for the new glass to bond to. Then lay up layers of glass getting progressively bigger as you fill the depression. Finally coat with gell coat and sand down for a good finish.
If the hole penetrates the hull you will need to back it to prevent the glass for sagging. You may have difficulty getting the glass to fold around the transom corner. The hull and transom would have originally been made separately and then bonded together. You may need to check that the original bonding is sound.
As Rene suggests there are some very good books on boat maintenance including fibre glass repairs. I had one called Don Casey's Complete Illustrated Sailboat Maintenance Manual. It was my bible for may first old yacht.
|
|
eublem
Junior Member
Posts: 10
|
Post by eublem on Apr 30, 2019 10:55:51 GMT
Thank you Sitara for a well explained comment. I have one question.
Should i fill the top part first, then add layers around the corner?
OR
Should I go all around, gradually ending it with smaller pieces where the depression is deepest?
|
|
|
|
Post by rene460 on Apr 30, 2019 23:21:48 GMT
Hi Eublem,
I don’t believe you are overthinking it, there is a lot to take in with your first attempts at this type of work, and that corner location is a bit more tricky than a hole punctured in the middle of a more plain area, so gather all the information you can before you start. Once you have wet resin, everything is sticky and difficult to adjust.
In my limited experience, the wetted mat does not easily bend around a sharp corner, and will not conform to a compound curve (radius in two directions) it just makes wrinkles, so you have to start with more narrow strips.
As Sitara has said, after grinding back to clean sound glass, start with the small pieces in the bottom of the depression and build up with gradually larger pieces.
As the hole seems to go right through you need to support the back first, preferably from the inside if it is possible.
The book I have is “Fibreglass Repairs” by P J Patrick. I don’t know if it is still in print. Or the one Sitara uses, or a similar one. Any of them will explain all the terminology, steps and precautions. I have not tried such a large repair, but with care you will get it done. My book suggests a two stage repair. First make a sound job to fill up to just below the final surface, then finish as a more shallow depression. This process avoids some of the difficulties due to shrinkage and reduces the final sanding required. It’s more like grinding than sanding in my limited experience. I am hoping that someone with more extensive experience will come in and add to the excellent description Sitara has given.
rene460
|
|
eublem
Junior Member
Posts: 10
|
Post by eublem on May 1, 2019 23:53:06 GMT
West Marine replied to my question and they repeated much of the same as you all did:
Grind down damaged area to get a smoother surface. Then they recommended to lay glass all over, with gradually smaller pieces where the depression is deepest. They stated is was the same repair as usual, just around a corner.
After your and West Marine's opinion, I'm more confident then previously. Hopefully I will end up posting a picture of the final result and not "HELP ME".
By the way... I was watching some youtube tutorials and she recommended the same book as you, Sitara. I'll have to put it on my wishlist now!!
|
|
|
|
Post by sitara on May 2, 2019 1:18:19 GMT
Hi Eublem, Just another thought, as you grind back the damage you will see how the original constriction was made. It may be a good idea to try and replicate this in the repairs. If you can get access to the transom from inside it would pay to put a few layers of glass over the hull/transom join.
|
|
|
|
Post by rene460 on May 2, 2019 4:38:58 GMT
Hi Eublem, it sounds like you are well on the way to the right job now. I know you won’t be able to take pictures with sticky fingers, but if you have someone able to take pictures as you go, I am sure you will have many interested followers.
Good look with the job, You will soon have her shining.
rene460
|
|
|
|
Post by vasko on May 2, 2019 15:48:58 GMT
Depends what you want ? easy fix ? or a biiiiig proper job...
easy fix - grind, fill with International Watertite, sand, spray two coats of primer, two coats of spray TK Gelcoat
big one - grind about 30-50cm gradually to the hole, 4-6 layer of epoxy + fiberglass fabric - 24h between layers and wait between 7 and 14 days after final layers, sand, apply International Watertite, wait 24h, sand , 2 coats of primer, 2 coats of TK gelcoat
|
|
eublem
Junior Member
Posts: 10
|
Post by eublem on May 28, 2019 18:44:53 GMT
|
|
|
|
Post by vasko on May 29, 2019 5:05:56 GMT
Use International Watertite epoxy fillet on top and you will be able to get smooth surface
|
|
eublem
Junior Member
Posts: 10
|
Post by eublem on May 29, 2019 14:37:00 GMT
Thanks! Do you think I'll be fine with using west system 404 (high density) to fair the surface?
|
|