
Procedure for removing a blockage on Frigoboat cap tubes
Dec 20, 2013 6:07:32 GMT
Post by panoramix on Dec 20, 2013 6:07:32 GMT
The title of this subject could be multiple like
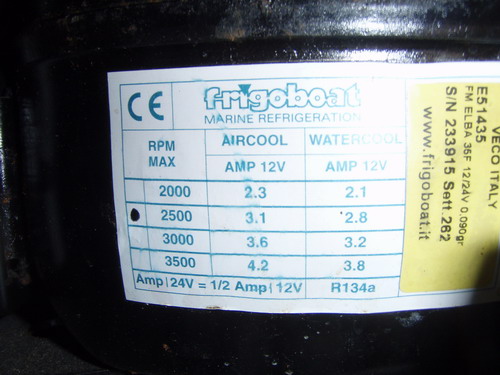
My boat is a Jeanneau SO 37 from 2003 with the standard Frigoboat Capri 35F
aircooled fridge. After 7 years in charter (Turkye) we took the boat out of
charter and started living aboard. We also added a keelcooler (2010) to the
existing Frigoboat system in order to save on batteries.
The fridge has been working fine until recently (nov 2013) when we returned
after a 4 months holiday to our yacht that was left in the Rio Dulce, Guatamala.
When we arrived on the boat we turned on the fridge and all was well for 2
weeks. But then the fridge stopped cooling. The compressor kept running and the
temperature inside the box went up. The evaporator was only cold to the touch. I
shut the fridge off for a few hours and turned it on again. And guess what, it
worked fine... for half a day. After a few more days of different behaviour i
decided that it could be low on refrigerant. I was able to find a shop where i
could borrow a gauge set and a bottle of pure refrigerant (no additives) Before
i connected the gauge set to the compressor i flushed it with refrigerant so
that no moistere could enter the system. I even had a small flow out of the hose
when i connected the fitting so that the small amount of air in the opposite
connector was also filled with R134a. I topped the system up until there was 8
psi on the suction side. When i put the bottle on the scale afterwards 225 grams
of R134a had left the bottle and most of it was in the system. It was cooling
like hell and the returnline was fully covered with frost! Now i know that this
is way to much refrigerant, but at that time i was happy that i got this fixed
myself. The only downside was that the power consumption had gone up to 6 amps.
After this exercise i had a look at the Frigoboat website and came to the
conclusion that i had an overcharge in the system. I vented some refrigerant
until the amps were back to the normal 4.5 amp. Now the cooling was back to
normal and no more frost on the returnline.
www.panoramixopzee.nl/pictures/5/Guatamala%20Rio%20Dulce%20koelleiding.jpg
This was the can R134a i used

www.panoramixopzee.nl/pictures/5/Guatamala%20Rio%20Dulce%20Refrigerante%20134a.jpg
Definitly to much refrigerant in the system.
And they lived happily ever after? Guess what, after one week the fridge fell
back to its original faulty behaviour. The evaporator only got sweaty cold to
the touch. We decided to switch the fridge off and use icecubes for the time
being. We sailed to Belize City, Cucumber Beach Marina, where we met Tony the
fridge repairman. By now the behaviour of the fridge had changed and it looked
like moisture was in the system. Placing a hot wet rag on the evaporator
entrance area would start the circulation again. Tony evacuated the system by
using the fridge's own compressor. He cut the high side tube that comes out of
the compressor. The end coming out of the compressor was left open, the other
end was closed by crimping and soldering. The gauge was connected to suction
side and the compressor was started. After some time the gauge had gone to a
complete vacuum. Now we heated the evaporator to a temperature that you could
not lay your hand on the plate. We repeated this procedure three times and left
the system for 24 hours running with a vacuum. Took out the old filter/dryer and
put in a new bigger one. I cut the old filter to check the contents. The silica
pellets were discolored which confirmed the moisture diagnosis. No debris was
found on the fine filter inside. Refilled the system and all was running fine. The
typical hissing and gurgling sound from the evaporator confirmed that there was
a good circulation of refrigerant. Evaporator completely covered with frost and
no frost on the returnline.
www.panoramixopzee.nl/pictures/5/Belize%20City%20koelkast%20met%20nieuw%20filter.jpg

www.panoramixopzee.nl/pictures/5/Belize%20City%20koelkast%20filter%20opengemaakt.jpg
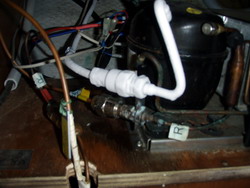
New filter/dryer installed after aircool. Old filter cut open with silica pellets
During the night i woke up and checked the fridge. The compressor was running
but no sound from the evaporator. So no flow and no cooling. Moisture was not an
option so this had to be a mechanical blockage. The suction side showed a vacuum
on the meter. I told Tony the bad news in the morning and suggested that we
could possibly get the blockage out by reversing the flow through the
evaporator. We disconnected the high side coupling of the evaporator and put
pressure on the suction side of the compressor. While holding a clean cloth over
the now disconnected coupling we depressed the valve inside the quick connect.
Out came a slow flow of clean oil. We changed the cotton cloth several times and
on the fifth cloth we noticed some debris. The cloth used comes from the
computer industry where these special cloths are used for maintenance on hard
drives. These cloths are guaranteed free of any contamination. On the picture
you can see three large hard chunks with the size of 1 mm. According to the tech

www.panoramixopzee.nl/pictures/5/Belize%20City%20purging%20the%20high%20side.jpg

www.panoramixopzee.nl/pictures/5/Belize%20City%20vuiltjes%20eerste%20vangst.jpg
Push the valve in the quick connect to purge the high side line of the evaporator
info on the quick connects, this debris could be the securing compound which is
used on the second set of nuts(the copper ones) on the quick connects. If one
ever sets the wrench on the wrong nut, you can break off some of that hardened
sealing compound. I think this is the most likely case. The copper coupling on
the quick connects are not so tight and it is very easy to accidentally rotate
them. As with the keelcooler install one has to bend and position three quick
connects so at this point debris could be generated or cracks are introduced in
the hardened compound so to break loose after time. We flushed a bit more , but
no more debris was noticed. Reconnected everything, added some R134a and the
fridge was up and running again.
But Murphy's law is never far away and during the night the circulation stopped
again. More debris i thought, so in the morning repeated the same operation by
flushing the evaporator backwards. Again lots of oil was coming out, but no
debris to see with the naked eye. I stopped and took a magnifier glass to
inspect the white cotton cloths. Now i could see tiny pieces of what looks like
metal scrap. Size of this debris is about 0.25 x 0.05 mm. No idea where that
comes from. But this was definitely the cause of the blockage. So now i
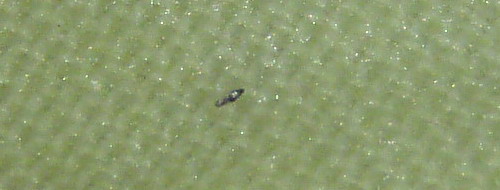
www.panoramixopzee.nl/pictures/5/Belize%20City%20vuiltjes%20tweede%20vangst.jpg
This small scrap (about 0.25 x 0.05 mm) came out on the second flush.
suggested to Tony to put a filter/dryer in the evaporator line just after the
keel-cooler. This suggestion i found on multiple fora with topics on keelcoolers
and this filter should now stop any debris from entering the capillary tube. So
far the system has been running fine and i will update this topic in a few
months time to let you know how things are.

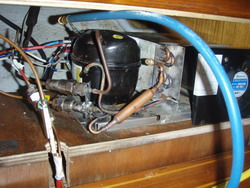
www.panoramixopzee.nl/pictures/5/Belize%20City%20Quick%20Connect%20Frigoboat%20coupling.jpg

www.panoramixopzee.nl/pictures/5/Belize%20City%20second%20filter%20dryer.jpg
Quick connect with broken sealant. Second filter/dryer in high side of evaporator
We took out the quick connect coupling when installing the second filter/dryer.
Conclusion: keelcooler installations are more prone to faulty quick connect
couplings (two of them) thereby generating small debris. As there is no filter
after the keelcooler this small debris can clog the capillary tube, thereby
blocking the circulation of refrigerant temporarily or permanent.
Soldering a filter in the high side line of the evaporator after the last quick
connect and before entering the cap tube is the right place and should prevent
any debris from entering the cap tube area.
The following links were very helpfull
After reading all this info and the technical documents, i now have a good
understanding of how these small marine refrigerators work and don't work!
PS: I have saved the debris that came out. So if anybody is interested...
- Strange behaviour of Frigoboat fridge
- Frigoboat keelcooler problems
- Intermittend cooling problem on Frigoboat
- Problems with capillary tube on Frigoboat
My boat is a Jeanneau SO 37 from 2003 with the standard Frigoboat Capri 35F
aircooled fridge. After 7 years in charter (Turkye) we took the boat out of
charter and started living aboard. We also added a keelcooler (2010) to the
existing Frigoboat system in order to save on batteries.
The fridge has been working fine until recently (nov 2013) when we returned
after a 4 months holiday to our yacht that was left in the Rio Dulce, Guatamala.
When we arrived on the boat we turned on the fridge and all was well for 2
weeks. But then the fridge stopped cooling. The compressor kept running and the
temperature inside the box went up. The evaporator was only cold to the touch. I
shut the fridge off for a few hours and turned it on again. And guess what, it
worked fine... for half a day. After a few more days of different behaviour i
decided that it could be low on refrigerant. I was able to find a shop where i
could borrow a gauge set and a bottle of pure refrigerant (no additives) Before
i connected the gauge set to the compressor i flushed it with refrigerant so
that no moistere could enter the system. I even had a small flow out of the hose
when i connected the fitting so that the small amount of air in the opposite
connector was also filled with R134a. I topped the system up until there was 8
psi on the suction side. When i put the bottle on the scale afterwards 225 grams
of R134a had left the bottle and most of it was in the system. It was cooling
like hell and the returnline was fully covered with frost! Now i know that this
is way to much refrigerant, but at that time i was happy that i got this fixed
myself. The only downside was that the power consumption had gone up to 6 amps.
After this exercise i had a look at the Frigoboat website and came to the
conclusion that i had an overcharge in the system. I vented some refrigerant
until the amps were back to the normal 4.5 amp. Now the cooling was back to
normal and no more frost on the returnline.
www.panoramixopzee.nl/pictures/5/Guatamala%20Rio%20Dulce%20koelleiding.jpg
This was the can R134a i used
www.panoramixopzee.nl/pictures/5/Guatamala%20Rio%20Dulce%20Refrigerante%20134a.jpg
Definitly to much refrigerant in the system.
And they lived happily ever after? Guess what, after one week the fridge fell
back to its original faulty behaviour. The evaporator only got sweaty cold to
the touch. We decided to switch the fridge off and use icecubes for the time
being. We sailed to Belize City, Cucumber Beach Marina, where we met Tony the
fridge repairman. By now the behaviour of the fridge had changed and it looked
like moisture was in the system. Placing a hot wet rag on the evaporator
entrance area would start the circulation again. Tony evacuated the system by
using the fridge's own compressor. He cut the high side tube that comes out of
the compressor. The end coming out of the compressor was left open, the other
end was closed by crimping and soldering. The gauge was connected to suction
side and the compressor was started. After some time the gauge had gone to a
complete vacuum. Now we heated the evaporator to a temperature that you could
not lay your hand on the plate. We repeated this procedure three times and left
the system for 24 hours running with a vacuum. Took out the old filter/dryer and
put in a new bigger one. I cut the old filter to check the contents. The silica
pellets were discolored which confirmed the moisture diagnosis. No debris was
found on the fine filter inside. Refilled the system and all was running fine. The
typical hissing and gurgling sound from the evaporator confirmed that there was
a good circulation of refrigerant. Evaporator completely covered with frost and
no frost on the returnline.
www.panoramixopzee.nl/pictures/5/Belize%20City%20koelkast%20met%20nieuw%20filter.jpg
www.panoramixopzee.nl/pictures/5/Belize%20City%20koelkast%20filter%20opengemaakt.jpg
New filter/dryer installed after aircool. Old filter cut open with silica pellets
During the night i woke up and checked the fridge. The compressor was running
but no sound from the evaporator. So no flow and no cooling. Moisture was not an
option so this had to be a mechanical blockage. The suction side showed a vacuum
on the meter. I told Tony the bad news in the morning and suggested that we
could possibly get the blockage out by reversing the flow through the
evaporator. We disconnected the high side coupling of the evaporator and put
pressure on the suction side of the compressor. While holding a clean cloth over
the now disconnected coupling we depressed the valve inside the quick connect.
Out came a slow flow of clean oil. We changed the cotton cloth several times and
on the fifth cloth we noticed some debris. The cloth used comes from the
computer industry where these special cloths are used for maintenance on hard
drives. These cloths are guaranteed free of any contamination. On the picture
you can see three large hard chunks with the size of 1 mm. According to the tech
www.panoramixopzee.nl/pictures/5/Belize%20City%20purging%20the%20high%20side.jpg
www.panoramixopzee.nl/pictures/5/Belize%20City%20vuiltjes%20eerste%20vangst.jpg
Push the valve in the quick connect to purge the high side line of the evaporator
info on the quick connects, this debris could be the securing compound which is
used on the second set of nuts(the copper ones) on the quick connects. If one
ever sets the wrench on the wrong nut, you can break off some of that hardened
sealing compound. I think this is the most likely case. The copper coupling on
the quick connects are not so tight and it is very easy to accidentally rotate
them. As with the keelcooler install one has to bend and position three quick
connects so at this point debris could be generated or cracks are introduced in
the hardened compound so to break loose after time. We flushed a bit more , but
no more debris was noticed. Reconnected everything, added some R134a and the
fridge was up and running again.
But Murphy's law is never far away and during the night the circulation stopped
again. More debris i thought, so in the morning repeated the same operation by
flushing the evaporator backwards. Again lots of oil was coming out, but no
debris to see with the naked eye. I stopped and took a magnifier glass to
inspect the white cotton cloths. Now i could see tiny pieces of what looks like
metal scrap. Size of this debris is about 0.25 x 0.05 mm. No idea where that
comes from. But this was definitely the cause of the blockage. So now i
www.panoramixopzee.nl/pictures/5/Belize%20City%20vuiltjes%20tweede%20vangst.jpg
This small scrap (about 0.25 x 0.05 mm) came out on the second flush.
suggested to Tony to put a filter/dryer in the evaporator line just after the
keel-cooler. This suggestion i found on multiple fora with topics on keelcoolers
and this filter should now stop any debris from entering the capillary tube. So
far the system has been running fine and i will update this topic in a few
months time to let you know how things are.
www.panoramixopzee.nl/pictures/5/Belize%20City%20Quick%20Connect%20Frigoboat%20coupling.jpg
www.panoramixopzee.nl/pictures/5/Belize%20City%20second%20filter%20dryer.jpg
Quick connect with broken sealant. Second filter/dryer in high side of evaporator
We took out the quick connect coupling when installing the second filter/dryer.
Conclusion: keelcooler installations are more prone to faulty quick connect
couplings (two of them) thereby generating small debris. As there is no filter
after the keelcooler this small debris can clog the capillary tube, thereby
blocking the circulation of refrigerant temporarily or permanent.
Soldering a filter in the high side line of the evaporator after the last quick
connect and before entering the cap tube is the right place and should prevent
any debris from entering the cap tube area.
The following links were very helpfull
- Problems frigoboat danfoss fridge - by Sailbleu
- Bizarre FrigoBoat Behaviour - by s/v Jedi
- Technical documents from Veco Frigoboat - a must read
After reading all this info and the technical documents, i now have a good
understanding of how these small marine refrigerators work and don't work!

PS: I have saved the debris that came out. So if anybody is interested...


 ) like t time n litres of water should go from T1 to T2 temp?
