|
|
Post by sailbleu on Nov 8, 2010 5:39:57 GMT
Hello people , i've posted my dilemma on several forums already , but nobody seems to be able to help me. Maybe there's a specialist on this board , i can only hope so. Here we go On my Meditarrenean trip while anchoring i've stumbled upong some drifting ropes. And yes , my propellor caught it with devastating consequences. 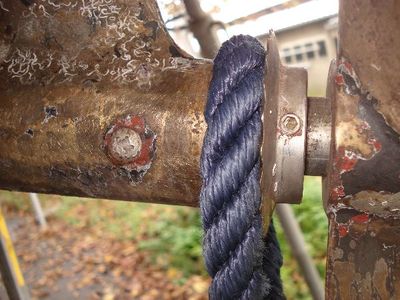 a similar rope turned 3 times around the shaft between the cutless bearing part and the rope cutter. The P- bracket was therefor pushed aside (to the left) ripping the fixture inside the boat. 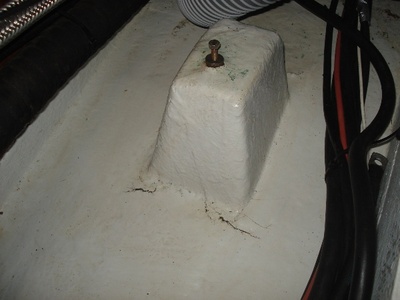 You can notice that the front part of glass-in structure was somewhat lifted up , breaking the fix. 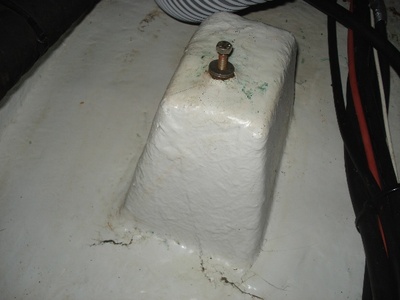  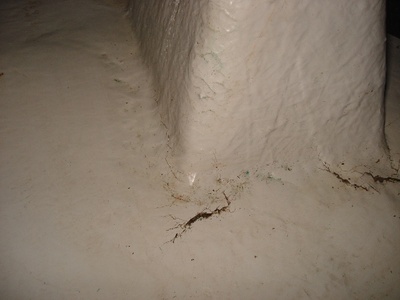 cracks in close up. The boat is on the hard now , but water was creeping through the cracks. 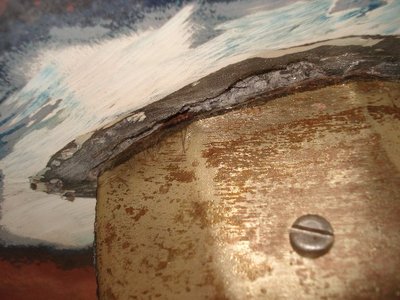 I cleaned up the aria around the strut. There is no damage on the outside by the looks of it So far I was given the advice to reinforce the outside strut to hull with epoxy/carbon fibre after filling the gap (which i made in order to clean-up the strut entry point) with epoxy paste. Ok , i just renewed and midified my posting to share my repair job with the community. So all the comments you read up to date you where before i posted the modification. After checking what had to be done , and after waiting untill the outside temp allowed me to handle epoxy resin I started the preparations a week ago. First of all I had to grind away all the old and cracked fiberglass , so adding new fibre wouldn't create a mountain inside. That was the hard part , I can tell you. I will save you the view on the warzone , not to scare anyone just in case someone has the same P-bracket issue. But it took a complete plastification of the area , 2 vacuumcleaners and an extra fan connected to one of the hoses inside the boat in order to keep the dust at bay. EDITOR: The missing images below can now be seen on the republished article on Hints and Tips www.jeanneau-owners.com/hintsandtips/Pbracketrepair.html
According to this pic it looks like it was a piece of cake doens't it. Let me assure you , ...it wasn't. This image is important , you can see a gap between the block and the hull , because of the lever effect of the P-bracket (see previous info above ) the block was ripped away (on the bow-side of it) from the hull tearing the fibre and allowing water to enter via the cracks. It turned out to be a good thing grinding the complete area because the old fixing was of no use anymore. I did not touch the back part of the block , leaving a partial fix so the aligment of the propshaft was still useable , and also because the old fibre was not compromised. But before glassing-in everything again , the gap between block and hul needed to be closed of course. I managed to do that by means of a construction outside the boat on the prop (see next pic) First things first , i filled the gaps inside with homemade epoxyfiller (epoxyresin , harder and aerosil) That seemed to be the proper decision because after jacking up the bracket , the epoxyfiller squeezed out the gaps glueing both parts together. Beside the glassing an extra fix so to speak. But before glassing also the old filling between the bracket and the outside hull was chiseled away so new epoxyfiller could be applied. See the preps for that in the next pics Taping the surroundings and using two pieces of wood shaped to the bracket and plastified so they would not stick to the epoxyfiller did hold that filler in place. The wood was also taped to the hull of course. Ok that 's that , now the glassing needed to be commenced. This is the kind of fibre i used , double layered , two different kinds of fibre glued to each other and it took me 2 square meters in total . Making the epoxyresin as it should , with a scale ,...very important. An average curing harder was used for this job , giving me some time to fiddle around. This was after all my first fibre adventure. And because of the my initiation it was a struggle to get the fibre on the right spot. First layer is in. Notice the grey colour on the joint of block and hull, this is also epoxyfiller running around the block underneath the fibre to shortcut the 90 degree corner due to the bending restriction of the fibreglass. Four layers done , and resin is curing already. I decided to wait for the finishing touch , covering the fibre with coloured epoxy untill I'm sure all is well. In other words , see you next winter. Leaving me to clear the bracket entree. |
|
|
|
Post by MalcolmP on Nov 8, 2010 19:17:07 GMT
Hi Sailbleu Very sorry to see this I have only a very limited knowledge gained by someone who had to have their P bracket replaced on a First 325 which has a very similar set up, but FWIW www.jeanneauparts.com/en/index.php?cp_sid=35708f72b3c&cp_tpl=mainshows the parts for the 40DS A replacement is quoted at around €350 euro plus tax I would suggest you need to think about an insurance claim if you can, this is a job for proven professionals. I would think it preferable to think a total replacement with a new bracket, rather than trying to do a repair and then possibly still not getting an acceptable alignment of the shaft As you can see from the drawing below the P bracket is bolted horizontally to supports each side (I would guess marine ply) then the whole lot is encapsulated in resin and glass to form the big block The whole existing bracket and support will need grinding out (potentially a real dust mess so you will need to remove as much as you can from the aft cabins and set up polythene dust walls etc), then the hole and the hull laminates in the area need to be cut back to and rebuilt, so bonding the new glasswork to the hull is a crucial issue Obviously the next critical part will be in rebuilding and realigning the P bracket so the shaft is positioned exactly correctly A Google search has flagged up this article that may help coxengineering.co.uk/Pbracket.aspxPlease detail how this goes, it is something that could happen to any of us Good luck Malcolm  |
|
|
|
Post by gene on Nov 8, 2010 20:52:10 GMT
Bummer, I too am curious to find out how the repairs go. While not an expert I agree completely with webcrew. The most telling is "water was creeping through the cracks". That indicates damage all the way through the solid glass hull. The strut must be removed and checked and most likely replaced along with proper rebuilding of the box (including proper alignment of the strut).
Gene
|
|
|
|
Post by sailbleu on Nov 9, 2010 5:49:49 GMT
Hi Malcolm/Gene ,
it must be said , the indicident happened to me halfway the trip. That means I was still able to use the prop for an extended period of time. No vibrations , no funny noise , no worn out cutless bearing .
I suppose the alignment is still ok.
Also , some time ago i googled-up the link you gave Malcolm , but it's about a tru bolted bracket.
Mine is completely glassed in.
I might try and drill a hole in that block to checkout the composition , I'm a bit reluctant to start grinding the block away before knowing how it's fixed.
I'll keep on posting my problem on more boards hoping for a lucky respons.
Thanks
|
|
|
|
Post by gene on Nov 9, 2010 23:49:35 GMT
The part that bothers me is that it started leaking. If it had not then I would be guessing the cracks are just in the thick gel-coat. But one wonders where the water is getting in. A broken seal could allow water up the sides of the strut and it might leak at the top around the grounding screw. But if water was leaking though the cracks then over time the glass will weaken. The next time you catch a rope it could tear the whole thing out and you end up with a hole in your boat.
That said the good news is you have plenty of room around it to add glass. I would think the strut is OK so if you don't want to go the route of checking with professionals then you could probably patch and stiffen around the box to hull and reseal below, strut to hull.
However, I would still contact Jeanneau to see how it exactly fits in there and is fastened.
Gene
|
|
|
|
Post by flippercarson on Nov 10, 2010 1:22:02 GMT
Okay... Here is your answer. It's not very often I can help, but when I can, I try to. The PDF details from Jeanneau the replacement process. It's not good news, but I hope it helps. Attachments:
|
|
|
|
Post by flippercarson on Nov 10, 2010 1:26:14 GMT
I should have added, that basically, you have to cut the whole thing out, get a new bracket if the old one is bent, make a mold, align the shaft and new p-bracket, fill the mould with flowable polyester, then when hard, glass the whole thing in again...
Either that, or try and fix what you have, but it would really suck if you found out later that it leaked or rotted, or worse, broke free and made a lot of damage.
|
|
|
|
Post by sailbleu on Nov 10, 2010 8:32:48 GMT
O jee thanks Flippercarson , your posting explained alot. If I understand it correctly , that massive block inside is hardened polyester , which is glassed on the innerhull.
Serious repair.
I could rely on my insurance for the repair , but 500 Euro own risk and an increase of my premium for years to come , mmmmm.
But then again , there is no structural damage on the strut nor on the outside hull.
Maybe i'll give a go myself , take some pictures for the board along the way and see what happens next season.
There are no cracks on the side or the rear of the solid block , so I guess a reinforcement on the front could do the trick.
No doubt it will be a dirty job grinding all that polyester/glass away.
To be continued
|
|
|
|
Post by flippercarson on Nov 10, 2010 15:31:05 GMT
You understand it correctly. If you open the PDF, the pictures will help with the understanding.
Sorry about your luck.
|
|
|
|
Post by gene on Nov 10, 2010 15:37:22 GMT
Actually I think this is good news. It means the solid potting is cracked. The fiberglass overlay is probably pretty thin. Grinding and filling with fiberglass overlay should give a solid repair and no water has gotten into the glass hull. I would be much more confident repairing this knowing how it is constructed. This assumes the strut is OK. I see no reason to think it is damaged.
Gene
|
|
|
|
Post by sailbleu on Nov 10, 2010 16:01:23 GMT
My sentiments exactly Gene.
Many thanks again Flippercarson.
Kind regards
|
|
|
|
Post by sailbleu on Mar 28, 2011 5:25:22 GMT
Refresh
|
|
|
|
Post by lateron on Mar 28, 2011 8:53:27 GMT
Hi flippercarson .....just been reading the refreshed posting re P bracket repair and noted the Jeanneau tech info download. Is it possible to download the whole of that booklet? I've googled for it but no success.
Cheers Lateron
|
|
|
|
Post by flippercarson on Mar 29, 2011 1:53:11 GMT
Sorry I can't be of more help, but that's the only document I had. Someone, somewhere at Jeanneau must have a whole bunch of these they could share....
|
|
|
|
Post by sailbleu on Mar 29, 2011 7:19:01 GMT
Ok , i resized the new pictures of the repair , I hope it's alot easier to have a look at them now.
Greetings
|
|
|
|
Post by sailbleu on Sept 30, 2011 4:07:10 GMT
I thought of leaving a feedback on the result of my DIY repair .
The 2011 season has ended for me and the boat is on the hard.
Ive been able to feel the propshaft play in the cutless bearing and am proud to say ,....there isn't any.
Meaning the alignment remained perfect after the repair.
The glassed in structure is still as solid as can be.
No leaks , no trembling no nothing.
The whole job took about 30 manhours scattered over a timespan of several weeks and the total cost mounted up to about 100 Euro .
All in all a fair deal for such a severe damage.
I was fortuned (what's in a word) to still be able to use the engine after the incident , it could of been a different situation all together if the bracket would broken off on the spot.
Getting towed to an Italian shipyard and get victimized with tourist prices/charges isn't funny.
Ok , I have an insurrance that covers a setback like this , but using them would have had premium consequences for years to come.
Now I reduced the cost dramatically and gained a great deal of experience.
Anyway , the reason why I refresh this topic is not to get into the picture , but merely emphasizing that repairs like these can be done by anyone having the time and/or appetite to spend.
Sometime it's just a matter of daring to jump.
Regards
|
|
|
|
Post by Amun Ra on Nov 29, 2011 18:07:42 GMT
Thank you very much for all of this. My 43DS hit a fishing pot line in June and we've been chasing a leak ever since. Finally tracked it down to cracking around the P bracket box - just as in your pictures.
These pictures and write up are very helpful, thank you. Mine is due to be rebuilt over Christmas, and I will take some pictures to add to the story here.
Best wishes
Julian
|
|
|
|
Post by sailbleu on Nov 30, 2011 9:36:05 GMT
Hello Julian ,
sorry to read your bad luck.
I think this happens to more sailors , but not everyone is willing to share it with the world.
I'm happy my posting will be of some help to you and I would be very interested in reading how you deal with the issue.
A month ago I finished the repairjob by putting on some dyed epoxyresin so everything is sort of as it was before the incident.
But I think I would do the repair in an other way if it would happen to me the first time.
Let me explain.
I used epoxyresin for the job , but you can also use polyesterresin , and since the boat is laminated with polyester it's no problem.
The reason for me to use epoxy is because this is stronger than polyester , one tends to do a proper job , but it's not neccesairy. A polyester repair is more than sufficiant.
Because I used epoxy I also had to use epoxy to do the finish , I could not use topcoat because topcoat is polyester based and polyester on epoxy is not compatible. Epoxy on polyester is. I found out in a later stage.
So if this problem should ever occur a second time , I am forced to use epoxy again for reasons stated above.
If I would have done the repair in polyester I could of used original (jeanneau)gelcoat which has the exact color as the rest of the boat.
Now I dyed the epoxy myself and got close , but not perfect. I'm a bit of a maniac you see.
Last week I rounded up another damage on the bow , and the original gelcoat I've ordered at blue marine in Dunkerk (France) is a perfect match , no color difference what so ever and my boat is 11 years old.
Will you do the repair yourself ?
Please keep us posted (preferably with loads of pictures :-) ) so we might all learn from your endeavour
Best regards
|
|
haven
Junior Member

Posts: 10
|
Post by haven on Nov 30, 2011 18:06:19 GMT
Ugh. Wouldn't you think that it was engineered with enough strength that a rope getting caught couldn't do that much damage?
|
|
|
|
Post by Amun Ra on Nov 30, 2011 22:21:06 GMT
Thank you, SB, for that info. I'm planning to have the repair done as an insurance claim by the shipwright in my marina, who is reasonably experienced in P bracket repair. Nothing that he has seen so far has worried him, so hopefully I don't have any damage beyond having cracked the box off the hull, as you did.
His plan is to cut everything out and start again - which is pretty similar to the Jeanneau Advice Note on how to repair it. So, shaft off (hopefully without dropping the rudder), chop and grind out the internal box, take out the P bracket and then, once everything has been cleaned up, fit it all back together.
Hopefully it should be better than new by the time he has finished. Like you, he has warned that trying to keep the mess under control whilst everything is taken apart will be the hardest phase of the job.
Interesting that you continued sailing after the problem. I have too, and have been sailing and motoring for several months without any particular problem. No vibration or other symptoms have been apparent. Perhaps I have just got used to it? Had the vibrations been bad, or become worse, I might have diagnosed the problem earlier. As you might notice from my previous posts on the board, I thought the my leak was caused by a leaking exhaust mixer box. If only....
Pictures to follow.
Best wishes
Julian
|
|
|
|
Post by sailbleu on Dec 1, 2011 6:49:09 GMT
Hi Julian,
I'm really interested and curious to see how professionals wrap up the repair.
Especially the making of a new block that holds the P-bracket in place.
I was also advised to remove everthing but the perfect lining up of the propshaft gave me some worry.
Also I had no idea how to install a new block , I suppose they use polyesterresin and pour it into a frame around the bracket inside. Afterwards it's glassed-in on the hull inside , as I did with my remaining old block/chunk .
I would be very grateful if you could take some picture of that procedure aswell.
That would a valuable piece of information to the forum community since everything is googleble.
We could also ask Marty to put your contribution on the hints and tips section maybe next to mine so future victims have all the help they can get.
Like I said , I think it happens to more people than we realize. The mediterranean coasts are covered with these boobytraps.
I have read a story of sailors where the P-Bracket just brooke off , having them loose propulsion and leaving them to their own devices. A towing job in others words.
I also considered using my insurance , but as I mentioned before , it would eventually cost me much more than doing it myself. I guess in material cost I got around 100 Euro.
I know , you still have to do it yourself , but it's just that I like an occasional challenge once and awhile.
All in all I'm happy with the result and it gave me , beside the satisfaction of DIY , a great deal of experience.
Please also tell us in due time what they charge the insurance for this repair .
@ Haven;
it all boils down to the fact that the ropecutter doesn't/didn't do what it's designed for.
In my case (and also Julians) it grabbed the rope instead of cutting it.
And you have to know that I sharpened the cutter before starting my trip last year. Didn't help anything whatsoever.
Maybe I (we) should consider removing the bugger.
Thanks alot
Kind regards
|
|
|
|
Post by Amun Ra on Dec 29, 2011 16:15:37 GMT
Well, my P bracket is now out of the boat and I was quite surprised to discover that the whole thing is held in place by being bedded into a large block of epoxy-like substance. I was expecting to find metal brackets that the P bracket would be through bolted to. Once the outer box had been cut away the remain block just came apart. I have some pictures and will post them later. It was interesting to see that when the bracket was damaged it lifted the 'floor', or topmost layer of flow coated epoxy, and that is what led to such a strange pattern of water seeping under the engine.
A bit more cutting out to do, to clean away the flow coated epoxy floor, then the rebuild starts. I am going to fit two lateral reinforcing metal struts which will pass through the P bracket, and the underside of the hull will be built up where the P bracket exits. That should make it properly robust.
Oh, and a rope cutter will be fitted!!
Happy Christmas!
Julian
|
|
|
|
Post by sailbleu on Dec 30, 2011 6:07:03 GMT
Oh yes please Julian , shows us some pics , as many as possible . I was/am looking forward to that.
It would also be a very worthy contribution for the hints and tips section , no doubt.
As far as I know , there isn't a single picture to find on the internet , before starting my repair I searched for it in vain
I'm really very curious on how that construction looks like once it's cleared from all the laminate.
As you know I didn't get that far , so it remained a mystery well hidden within the big lump of polyester.
If I may , I can provide you my email adress by PM , this way you could send me the whole shabang , I would be very gratefull for that.
And since Christmas has pasted , I wish you and all the board members a safe and happy new year.
Kind regards
|
|
|
|
Post by Amun Ra on Dec 30, 2011 22:19:31 GMT
Picture attached  |
|
|
|
Post by Amun Ra on Dec 30, 2011 22:24:12 GMT
It is interesting to see how the P bracket lifted the flow-coating up off the hull, which subsequently allowed water to seep forwards, under it and appear at the rear of the engine. I would have expected the water to come in through the cracks at the front of the box. The flow-coating will be ground out around the P bracket hole and rebuilt . The only thing keeping the water from flooding in at a greater speed was the sealant around the hole. The whole block, which you can see in the previous picture, was loose inside the GRP box.  |
|


